Friday 9 August 2013

Use Visual Studio 2012 for SSIS 2012

Case
I want to use Visual Studio 2012 to edit my SSIS packages, but during installation of Microsoft SQL Server Data Tools - Business Intelligence for Visual Studio 2012,  I get an error:
Rule "Same architecture installation" failed. The CPU architecture of installing feature(s) is different than the instance specified. To continue, add features to this instance with the same architecture.
The CPU architecture of installing feature(s) is different than the instance specified. To continue, add features to this instance with the same architecture.
The CPU architecture of installing feature(s) is different
than the instance specified. To continue, add features
to this instance with the same architecture


Solution
During installation you selected the wrong Installation Type. Although it might not sound logical, you should perform a new installation instead of adding features to the existing instance.
Do NOT add features to an existing instance


For the sake of completeness, lets review all steps.

1) Download
First download Microsoft SQL Server Data Tools - Business Intelligence for Visual Studio 2012

2) Start installation
Start the installer and include any updates.


3) Installation type
Now the important one. Use the default installation type: Perform a new installation of SQL Server 2012.
Perform a new installation of SQL Server 2012

License


4) Features
Select all features and then, Next, next...
Select all features (at least the first)


No errors or warnings this time


5) Finish
Finish the installation and start SQL Server Data Tools (SSDT) for Visual Studio 2012. Now you will see the familiar BI project types.
Finished

New: the BI project templates


6) Color themes
When you install Visual Studio 2012 Update 4 you will get an extra blue color theme which is less depressing then the light grey and dark grey color themes. Or use the Visual Studio 2012 Color Theme Editor for even more color themes.

The color themes of Visual Studio 2012


Tuesday 6 August 2013

Sending mail within SSIS - Part 1: Send Mail Task

Case
I want to send mail within SSIS, preferably HTML formatted. What are the options?

Solutions
There are a couple of solutions to mail within SSIS:
  1. Send Mail Task
  2. Script Task with SmtpClient Class
  3. Execute SQL Task with sp_send_dbmail
  4. Custom Tasks like Send HTML Mail Task or COZYROC

To demonstrate the various solutions, I'm working with these four SSIS string variables. They contain the subject, body, from- and to address. Add these variables to your package and give them a suitable value. You could also use parameters instead if you're using 2012 project deployment.
Add these four variables to your package


A) Send Mail Task
This is the standard task within SSIS to send mail. Good for simple plaintext emails but there are a couple of drawbacks. First see how it works.

1) SMTP Connection Manager
Right click in the Connection Managers window and add an SMTP Connect manager. Add the SMTP server. This is the first drawback. The settings are very limited. Things like port or credentials can't be set.
SMTP Connection manager


2) Send Mail Task
Add the Send Mail Task to the Control Flow (or to an event handler). Give it a suitable name and on the Mail pane at SmtpConnection, select our new Connection Manager.
Select SMTP Connection Manager


3) Expressions
After selecting the Connection Manager (leave rest unchanged) go to the Expressions pane and add an expression on the subject, body, to and from. Use the variables to overwrite these fields. After this click OK to close the editor and test it.
Expressions


4) Testing
Now run the task and check the mailbox. Now you will see the second drawback. The Send Mail Task doesn't support HTML formatted mail. So only plain text.
No HTML Formatting


If you want to overcome the two drawbacks then you have to use one of the other solutions. Next example solution: Script Task

Sending mail within SSIS - Part 2: Script Task

Case
I want to send mail within SSIS, preferably HTML formatted. What are the options?

Solutions
There are a couple of solutions to mail within SSIS:
  1. Send Mail Task
  2. Script Task with SmtpClient Class
  3. Execute SQL Task with sp_send_dbmail
  4. Custom Tasks like Send HTML Mail Task or COZYROC

To demonstrate the various solutions, I'm working with these four SSIS string variables. They contain the subject, body, from- and to address. Add these variables to your package and give them a suitable value. You could also use parameters instead if you're using 2012 project deployment.
Add these four variables to your package


B) Script Task
The Script Task is a little harder to use than the Send Mail Task (if you don't have .Net knowledge), but it doesn't have the same drawbacks as the Send Mail Task. It uses the SmtpClient Class and it has an HTML formatted mail option and a configurable port number.

1) SMTP Connection Manager
This first step is optional. I like to use as much as possible standard connection managers. Right click in the Connection Managers window and add an SMTP Connect manager. Add the SMTP server and change other options if necessary (other options are not used in this example). The alternative is to use an extra SSIS string variable for storing the SMTP Server.
SMTP Connection manager


2) Add Script Task
Add a Script Task to your Control Flow (or one of the event handlers). Give it a suitable name and add the SSIS variables as readonly variables to the Script Task.
Add all SSIS variables as ReadOnly


3) The Script
In the Scipt I'm using the variables and the connection manager to fill the properties of the SMTP client. Copy the contents of the Main method to your method and add the extra import/using on top.
// C# Code
using System;
using System.Data;
using Microsoft.SqlServer.Dts.Runtime;
using System.Windows.Forms;
using System.Net.Mail;          // Added

namespace ST_df6618207373422d961b80ca8b6a56e2
{
    [Microsoft.SqlServer.Dts.Tasks.ScriptTask.SSISScriptTaskEntryPointAttribute]
    public partial class ScriptMain : Microsoft.SqlServer.Dts.Tasks.ScriptTask.VSTARTScriptObjectModelBase
    {
        public void Main()
        {
            // Storing SSIS variables in .Net variables. You could skip this step and call the SSIS variables in the actual mail code
            // to reduce the number of code lines. Or you could fill these .Net variables with hardcoded values.
            String SendMailFrom = Dts.Variables["SendMailFrom"].Value.ToString();
            String SendMailTo = Dts.Variables["SendMailTo"].Value.ToString();
            String SendMailSubject = Dts.Variables["SendMailSubject"].Value.ToString();
            String SendMailBody = Dts.Variables["SendMailBody"].Value.ToString();

            // Get SMTP Server from SMTP Connection Manager. Alternative is to use extra variables or paramters instead:
            // String SmtpServer = Dts.Variables["SmtpServer"].Value.ToString();
            String SmtpServer = Dts.Connections["My SMTP Connection Manager"].Properties["SmtpServer"].GetValue(Dts.Connections["My SMTP Connection Manager"]).ToString();

            // Create an email and change the format to HTML
            MailMessage myHtmlFormattedMail = new MailMessage(SendMailFrom, SendMailTo, SendMailSubject, SendMailBody);
            myHtmlFormattedMail.IsBodyHtml = true;

            // Create a SMTP client to send the email
            SmtpClient mySmtpClient = new SmtpClient(SmtpServer);
            mySmtpClient.Port = 2525; // If you want to use a different portnumber instead of the default. Else remove this line.
            mySmtpClient.Send(myHtmlFormattedMail);

            // Close Script Task with success
            Dts.TaskResult = (int)ScriptResults.Success;
        }

        #region ScriptResults declaration

        enum ScriptResults
        {
            Success = Microsoft.SqlServer.Dts.Runtime.DTSExecResult.Success,
            Failure = Microsoft.SqlServer.Dts.Runtime.DTSExecResult.Failure
        };
        #endregion
    }
}

or use VB.Net code

' VB.Net Code
Imports System
Imports System.Data
Imports System.Math
Imports Microsoft.SqlServer.Dts.Runtime
Imports System.Net.Mail             ' Added

<Microsoft.SqlServer.Dts.Tasks.ScriptTask.SSISScriptTaskEntryPointAttribute()> _
<System.CLSCompliantAttribute(False)> _
Partial Public Class ScriptMain
    Inherits Microsoft.SqlServer.Dts.Tasks.ScriptTask.VSTARTScriptObjectModelBase

    Public Sub Main()
        ' Storing SSIS variables in .Net variables. You could skip this step and call the SSIS variables in the actual mail code
        ' to reduce the number of code lines. Or you could fill these .Net variables with hardcoded values.
        Dim SendMailFrom As String = Dts.Variables("SendMailFrom").Value.ToString()
        Dim SendMailTo As String = Dts.Variables("SendMailTo").Value.ToString()
        Dim SendMailSubject As String = Dts.Variables("SendMailSubject").Value.ToString()
        Dim SendMailBody As String = Dts.Variables("SendMailBody").Value.ToString()

        ' Get SMTP Server from SMTP Connection Manager. Alternative is to use extra variables or paramters instead:
        ' Dim SmtpServer as String = Dts.Variables("SmtpServer").Value.ToString();
        Dim SmtpServer As String = Dts.Connections("My SMTP Connection Manager").Properties("SmtpServer").GetValue(Dts.Connections("My SMTP Connection Manager")).ToString()

        ' Create an email and change the format to HTML
        Dim myHtmlFormattedMail As New MailMessage(SendMailFrom, SendMailTo, SendMailSubject, SendMailBody)
        myHtmlFormattedMail.IsBodyHtml = True

        ' Create a SMTP client to send the email
        Dim mySmtpClient As New SmtpClient(SmtpServer)
        mySmtpClient.Port = 2525 ' If you want to use a different portnumber instead of the default. Else remove this line.
        mySmtpClient.Send(myHtmlFormattedMail)

        ' Close Script Task with success

        Dts.TaskResult = ScriptResults.Success
    End Sub

#Region "ScriptResults declaration"
    'This enum provides a convenient shorthand within the scope of this class for setting the
    'result of the script.

    'This code was generated automatically.
    Enum ScriptResults
        Success = Microsoft.SqlServer.Dts.Runtime.DTSExecResult.Success
        Failure = Microsoft.SqlServer.Dts.Runtime.DTSExecResult.Failure
    End Enum

#End Region

End Class

4) The result
Close the Script Task and execute it: An email message with html formatting!
HTML formatted email


If you're not into .Net, but really like TSQL then check out the next solution: Execute SQL Task with sp_send_dbmail

Sending mail within SSIS - Part 3: Execute SQL Task

Case
I want to send mail within SSIS, preferably HTML formatted. What are the options?

Solutions
There are a couple of solutions to mail within SSIS:
  1. Send Mail Task
  2. Script Task with SmtpClient Class
  3. Execute SQL Task with sp_send_dbmail
  4. Custom Tasks like Send HTML Mail Task or COZYROC

To demonstrate the various solutions, I'm working with these four SSIS string variables. They contain the subject, body, from- and to address. Add these variables to your package and give them a suitable value. You could also use parameters instead if you're using 2012 project deployment.
Add these four variables to your package


C) Execute SQL Task
The Execute SQL Task solution uses a stored procedure from SQL Server. To use that you first have to configure database mail in SSMS.

1) Database Mail Wizard
Open SQL Server Management Studio (SSMS). Go to Management and then to Database Mail.
Database Mail


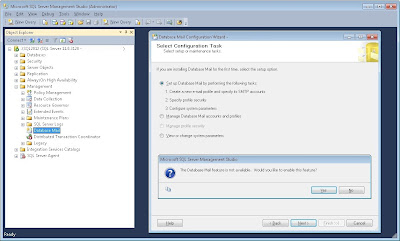
2) Enable Database Mail
If Database Mail isn't available it will ask for it. Choose the first option to create a profile.
Enable Database Mail and create profile


3) Create Profile
Enter a name and description for the mail profile. You will need the name in the stored procedure later on.
Create a mail profile


4) New Database Mail Account
Click the Add button to create a new database mail account. This is where you configure the SMTP server and the FROM address.

Configure SMTP and FROM address


Account ready, continue wizard


5) Public / Private
Make your profile public (or private)
Public profile


6) System Parameters
Configure the System Parameters like max attachment size.
Configure System Parameters


7)  Finish wizard
Now finish the wizard and go back to SSIS / SSDT.
Finish

Close


8) Add OLE DB Connection Manager
Add an OLE DB Connection Manager and connect to the server where you configured DatabaseMail.
OLE DB Connection Manager


9) Add Execute SQL Task
Add an Execute SQL Task to the Control Flow or an Event Handler. Edit it and select the new connection manager. In the SQLStatement field we are executing the sp_send_dbmail stored procedure with some parameters to get the, subject, body and from address from the SSIS variables.

' Stored Procedure with parameters
EXEC msdb.dbo.sp_send_dbmail
    @profile_name = 'SSIS Joost Mail Profile',
    @recipients = ?,
    @subject = ?,
    @body = ?,
    @body_format = 'HTML' ;

sp_send_dbmail in SSIS


10) Parameters
Go to the Parameter Mapping pane and add the SSIS string variables as parameters. We can't configure the FROM address because we did that already in SSMS (Step 4).
Parameters


11) The result
Now execute the Execute SQL Task and watch your mailbox.

An email with html formatting


If you don't like this solution, check out the Script Task solution or the third party tasks.
Related Posts Plugin for WordPress, Blogger...