What can you do with the Data Streaming Destination in SSIS and how does it work? It only has an 'Advanced' editor with very little explanation.
 |
| Editor Data Streaming Destination |
Solution
You probably never used or even saw this destination component before because it was a separate download in SSIS 2012 and for SSIS 2014 I couldn't even find the download page. But now for SSIS 2016 it's one of the standard toolbox items. And even now it's in the wrong toolbox section: you will find it under Common instead of Other Destinations. That can be easily solved by moving it the appropriate section of the SSIS Toolbox.
 |
| Moving Data Streaming Destination |
The Data Streaming Destination allows you to query its output via a linked server connection on the SSISDB. If certain sources or transformations are very hard with standard TSQL then you could solve it in an SSIS package. After that you can query its output with TSQL. Yes I know almost every thing is possible with TSQL when you for example use CLR stored procedures, but SSIS is just a visual alternative.
1) Data Flow Task
For this example I will use a package with one very basic Data Flow Task with a Flat File Source Component, a Derived Column and the Data Streaming Destination.
 |
| Simple Data Flow with Data Streaming Destination |
2) Data Streaming Destination
When you add the Data Streaming Destination and edit it, you will get the Advanced Editor. It only allows you to choose the input columns and you can change the name of an automatically generated identity column (see previous screenshot). For this example I pass through all columns and leave the id column name unchanged.
 |
| Pass through all columns |
3) Saving and deploying
Now I need to deploy the package(s) to the SSIS Catalog. You could add parameters and create an SSIS Catalog environment to fill them on package start. I will skip that for this basic example.
 |
| Deploying packages to SSIS Catalog |
4) Data Feed Publishing Wizard
Now start the SQL Server Integration Service Data Feed Publishing Wizard from the start menu and choose which package to execute in your view. You also need to provide the name and location of your view. For Linked Server validation errors go to step 4b.
(C:\Program Files (x86)\Microsoft SQL Server\130\DTS\Binn\ISDataFeedPublishingWizard.exe)
 |
| SSIS Data Feed Publishing Wizard |
4b) Error: The Allow Inprocess option for the OLE DB Provider is not enabled.
When you get a Linked Server error during validation you need to enable "Allow inprocess".
 |
The Allow Inprocess option for
the OLE DB Provider is not enabled.
|
Go to SSMS and connect to your server where the SSISDB is running. Expand Server Objects, Linked Servers, Providers and then right click SSISOLEDB and choose Properties. In the Provider Options enable "Allow inprocess" and click OK. After that Rerun volition in the Wizard.
 |
| Provider Options, Enable "Allow inprocess" |
4c) Error: The are more than one Data Streaming Destination components in the package and only one of them can pass data to a SQL Server database
The error says it all: You can only have one Data Streaming Destination! Remove the others first and rerun validation.
 |
The are more than one Data Streaming Destination components
in the package and only one of them can pass data
to a SQL Server database
|
5) Testing the view
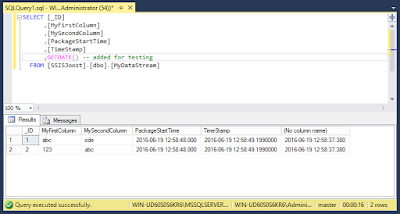
Go to SSMS and execute your newly created view. You probably have to test you patience a little bit because it's not very fast. It first has to execute the package which takes a couple of seconds. I haven't found a good purpose for a real-life situation yet, but may be you can use it to create a (nearly) real time data feed from a webservice for your PowerBI report. Or..... let me know in the comments where you used it for.
 |
| Querying the new view |
If you don't want to use the wizard you could just do it with TSQL:
USE [SSISJoost]
GO

SET ANSI_NULLS ON
GO

SET QUOTED_IDENTIFIER ON
GO

CREATE VIEW [dbo].[MyDataStream] AS SELECT * FROM OPENQUERY([Default Linked Server for Integration Services], N'Folder=DataStream;Project=DataStream;Package=DataStream.dtsx')
GO


