Showing posts with label POWERSHELL. Show all posts

Friday, 8 November 2019

Azure DevOps - Deploy SSIS project (CD)

Case
Recently you showed how to build an SSIS project in DevOps, but how do you deploy an SSIS project within DevOps.
Release SSIS in DevOps


Solution
There are no out of the box tasks yet, but there are a couple of Third Party DevOps tasks for SSIS which you could try-out. For this example we will use little PowerShell code which we have done before.
Update Dec 6: New Microsoft SSIS Deploy task

1) New Release Pipeline - Empty Job
The first step is to create a new Release Pipeline. For this example we will use an empty job to start with and later on add tasks manually.
  • Go to the Pipelines menu on the left
  • Go to Releases
  • Click on + New to create a New Release pipeline
  • Next choose 'Empty job'
Next step is to give the first Stage its name. A Stage is an environment like acceptance or production where you want to deploy to. For this example we will have three stages / environments: Dev/Tst, Acc and Prd. The next two stages will be created by using cloning, but first we will add tasks so that you don't have to repeat yourself.
  • After choosing 'Empty job' a first stage is created. Rename it 'DEV/TST'
  • Close the Stage pane by clicking the cross in the upper right corner
Create Relesae Pipeline


2) Select Artifact
In the Artifact pane you need to select the Artifact (the ispac file) you created in the Build Pipeline. So look the name before you start.
  • In the Artifacts pane click on + Add to add an artifact
  • Choose the project if you have multiple DevOps projects
  • Select the Artifact of the CI pipeline
  • Select Latest version
  • Optionally rename the source alias
  • Click on the Add button
We also need to determine whether we want to use the Continuous deployment trigger or perhaps use an other trigger or scheduling. For this example we will use the CD trigger.
  • Click on the lightning icon
  • Enable Build trigger (to release after each new successful build)
  • Close the CD trigger pane by clicking the cross in the upper right corner
Add Artifact and enable Continuous deployment


3) Add task to first stage
Now we need to add a task to do the actual deployment of the SSIS ispac file. There are a couple of third party SSIS deployment tasks, but the instructions and examples of those are not always that clear. Hopefully Microsoft will create there own SSIS devops tasks soon. For now we will use a little Powershell scripting.
  • Within the first Stage pane, click on the '1 job, 0 task' link to go to the job
  • Optionally change the settings of the Agent job (for example its name)
  • Click on the + icon in the Agent Job to add a new task
  • Search for 'Powershell'
  • Add the task called PowerShell (Run a PowerShell script on Linux, macOS, or Windows)
  • Click on the new task and rename it to Deploy SSIS project
  • Select Inline as Type
  • Paste the script below in the Script textbox
Add PowerShell code to deploy SSIS


Notice the Params piece in the PowerShell code. You could hardcode each value, but for this example we will use Variables from the Release pipeline to set the value of these parameters in the next step. The string "$(SsisServer)" in the code will be replaced by the value of the DevOps variable and result in: "bitools.database.windows.net" (see next step).

# PowerShell code
# Params
$SsisServer ="$(SsisServer)"
$SSISDBUsername = "$(SsisDBUsername)"
$SSISDBPassword = "$(SsisDBPassword)"
$FolderName = "RM"

# Mask the password to show something on
# screen, but not the actual password
# This is for testing purposes only.
$SSISDBPasswordMask = $SSISDBPassword -replace '.', '*'
 

Write-Host "========================================================================================================================================================"
Write-Host "==                                                         Used parameters                                                                            =="
Write-Host "========================================================================================================================================================"
Write-Host "SSIS Server            : " $SsisServer
Write-Host "SQL Username           : " $SSISDBUsername
Write-Host "SQL Password           : " $SSISDBPasswordMask
Write-Host "========================================================================================================================================================"

############## ASSEMBLY ###############
# Add SSIS assembly so you can do SSIS stuff in PowerShell
Write-Host "Referencing SSIS assembly"
$SsisNamespace = "Microsoft.SqlServer.Management.IntegrationServices"
# Load the IntegrationServices Assembly
[System.Reflection.Assembly]::LoadWithPartialName("Microsoft.SqlServer.Management.IntegrationServices") | Out-Null;


############## SQL SERVER ###############
Write-Host "Connecting to Azure SQL DB server $($SsisServer)"

# Create a connectionstring for the Azure DB Server
# Make sure you use SSISDB as the Initial Catalog!
$SqlConnectionstring = "Data Source=$($SsisServer);User ID=$($SSISDBUsername);Password=$($SSISDBPassword);Initial Catalog=SSISDB;"
 
# Create a connection object
$SqlConnection = New-Object System.Data.SqlClient.SqlConnection $SqlConnectionstring
 
# Check if the connection works
Try
{
    $SqlConnection.Open();
    Write-Host "Connected to Azure SQL DB server $($SsisServer)"
}
Catch [System.Data.SqlClient.SqlException]
{
    Throw  [System.Exception] "Failed to connect to Azure SQL DB server $($SsisServer), exception: $($_)"
}


############## SSISDB ############### 
# Create the Integration Services object
$IntegrationServices = New-Object $SsisNamespace".IntegrationServices" $SqlConnection
  
# Check if SSISDB connection succeeded
if (-not $IntegrationServices)
{
    Throw  [System.Exception] "Failed to connect to SSISDB on $($SsisServer)"
}
else
{
    Write-Host "Connected to SSISDB on $($SsisServer)"
}

# Create object for SSISDB Catalog
$Catalog = $IntegrationServices.Catalogs["SSISDB"]
  
# Check if the SSISDB Catalog exists
if (-not $Catalog)
{
    # Catalog doesn't exists. The user should create it manually.
    # It is possible to create it, but that shouldn't be part of
    # deployment of packages.
    # Also make sure the catalog is SSISDB and not master or any
    # other database.
    Throw  [System.Exception] "SSISDB catalog doesn't exist. Create it manually!"
}
else
{
    Write-Host "Catalog SSISDB found"
}

############## CATALOG FOLDER ###############
# Create object to the (new) folder
$Folder = $Catalog.Folders[$FolderName]
  
# Check if folder already exists
if (-not $Folder)
{
    # Folder doesn't exists, so create the new folder.
    Write-Host "Creating new folder" $FolderName
    $Folder = New-Object $SsisNamespace".CatalogFolder" ($Catalog, $FolderName, $FolderName)
    $Folder.Create()
}
else
{
    Write-Host "Folder" $FolderName "found"
}
 
############## LOOP ISPACS ###############
Get-ChildItem -Filter "StandardReportGenerator.ispac" -Recurse | Where-Object { -Not ($_.FullName -match "obj") } | ForEach-Object {

    ############## PROJECT ###############
    $IspacFilePath = $_.FullName

    # Check if ispac file exists
    if (-Not (Test-Path $IspacFilePath))
    {
        Throw  [System.IO.FileNotFoundException] "Ispac file $IspacFilePath doesn't exists!"
    }
    else
    {
        $IspacFileName = split-path $IspacFilePath -leaf
        Write-Host "Ispac file" $IspacFileName "found"
    }

    # Get project name from ispac file
    $ProjectName = [system.io.path]::GetFileNameWithoutExtension($IspacFilePath)

    # Reading ispac file as binary
    [byte[]] $IspacFile = [System.IO.File]::ReadAllBytes($IspacFilePath) 
    $Folder.DeployProject($ProjectName, $IspacFile) | Out-Null
    $Project = $Folder.Projects[$ProjectName]
    if (-not $Project)
    {
        # Something went wrong with the deployment
        # Don't continue with the rest of the script
        return ""
    }

    Return "Ready deploying $IspacFileName " 
}

Note: this script uses a DB user to connect to the SSIS DB. For other authorisations you need to change the code block starting on line 30.

4) Add variables
For this example we need three variables: SsisServer, SsisDBUsername and SsisDBPassword
  • Go to the Variables tab
  • Click on the + Add to add the first variable
  • Enter the name of the variable
  • Enter the value of the variable
  • Hit the padlock icon when it's a sensitive value like a password
  • Select the first stage 'Dev/Tst' as scope
Repeat this for all three variables and later on, after the next step, repeat this for each Stage. Just add the same variables but change the scope to Acc or Prd.
Add variables to DevOps


5) Add stages
Now we need to clone the Dev/Tst stage to Acc and to Prd.
  • Click on the Pipeline tab if you don't see your first Stage
  • Hover above the first stage and wait for the clone button to appear and click it
  • Next rename it to Acc
  • Repeat this for Prd
Notice the red exclamation mark before the variables tab after adding a stage: you need to add the same variables for each stage.
Adding stages for Acc and Prd


For each Stage you can determine how that Stage starts. These are the 'Pre-deployment conditions'. For example for Dev/Tst you could do an automatic deployment, for Acc you first need an approval from one person and for Prd you need two approvals.
  • Click on the lightning/person icon on the left side of each Stage to set it
  • Dev/Tst will use the 'After release' trigger and the next stages will use the 'After stage trigger'
  • For Acc and Prd you could add Pre-deployment approvals by selecting one of your teammembers.
  • Close the Pre-deployment conditions pane by clicking the cross in the upper right corner
  • Repeat this for all stages
And don't forget to add the variables when you have finished the Pre-deployment settings.
Adding Pre-deployment conditions for each stage


6) Test
Now create a new release by activating the build task. After this a new artifact will be created and this will trigger the release pipeline. You can also hit the Create Release button in the upper right corner to use the last created artifact. The artifact will automatically be released to the first stage, but the next step waits for approval (click on the blue ACC button to approve).
Dev/Tst succesful, Acc waiting for approval


You can also check the result of the release by clicking on Dev/Tst and then click on the PowerShell step. If it failed you can see the error messages per step.
See result of deployment


Conclusions
In this step you saw how to create a Release pipeline with several Stages and learned how these deployment stages are activated with the Pre-deployment conditions. Unfortunately there are no out-of-the-box Microsoft SSIS devops tasks which force you to either use Third Party tasks or PowerShell. Also take a look around and see all the other options in the build pipeline.


Wednesday, 12 June 2019

Azure DevOps - Build SSIS project (CI)

Case
I have my SSIS project in Git (Azure Repos Git) and I want to build my project in Azure DevOps. How do I add Continuous Integration (CI) for my SSIS project?
DevOps - Build pipeline


Solution
For this example we start with an SSIS project already in Azure Repos Git and build the project automatically when committing changes. Deployment (CD) of SSIS will be handled in a separate post.
Update Dec 6: New Microsoft SSIS Build task

1) New Build Pipeline
Go to Pipelines and then to Builds. In the list of pipelines you will find the + New sign. Click on it and choose New build pipeline. Now you can choose where your code is located. However on the bottom you will find the option "Use the classic editor to create a pipeline without YAML." For this example we will use this option since SSIS is a bit old school. As last step choose the Empty job and give your CI pipeline a useful name.
Creating new CI pipeline in DevOps for SSIS


2) NuGet Tool Installer
Since we will be needing an SSIS building tool that is available as NuGet, we first need to install NuGet itself. Click on the plus icon behind the "Agent job 1" (you need to give that a better name) and search for "NuGet" choose the NuGet Tool Installer and determine which version of NuGet you need. Fot this example I used 5.1.0 but click on the information icon behind version to get a list of of versions.
DevOps - NuGet Tool Installer


3) NuGet SSISBUILD
Now that we have installed the tool NuGet itself we can install a so called NuGet package. The one we will be needing is called SSISBuild. Add a Task to the agent and search for NuGet again. Choose NuGet and change the command to Custom. Then enter the follow command to install SSISBuild to the Build Server: install SSISBuild -Version 2.3.0
DevOps - NuGet install SSISBuild


4) PowerShell to build SSIS project
Now the most important step: the building of the SSIS project. We will be using PowerShell for this Task. Add a PowerShell Task to run PowerShell on Windows(, macOS, or Linux). Then change the script type to InLine and copy & paste the code below. On the first line of code (excl comments) you have to specify the path of your SSIS project starting from the solution folder untill the extension .dtproj. In the code a Predefined variable called Build.SourcesDirectory will be concatenated to this path to specify the project path on the server.
DevOps - PowerShel task to build the SSIS project


# PowerShell code
# The path of the project starting from the solution folder
$ProjectToBuild = "\SSIS\RM\StandardReportGenerator\StandardReportGenerator.dtproj"

# Join the path of the build server with the path of the project
$ProjectFilePath = Join-Path -Path $env:BUILD_SOURCESDIRECTORY -ChildPath $ProjectToBuild

# Check if the file exists on the build server
if (!(Test-Path $ProjectFilePath)) {
    # Not found, throw error
    throw "Project $($ProjectFilePath) not found!"
}
else
{
    # Call ssisbuild.exe with parameters to build this project
    &"$($env:BUILD_SOURCESDIRECTORY)\SSISBuild.2.3.0\tools\ssisbuild.exe" $ProjectFilePath -Configuration Development -ProtectionLevel DontSaveSensitive

    # Check whether the build was successful
    if ($LASTEXITCODE -ne 0) {
        # Build failed, throw error
        throw "Build of $($ProjectFilePath) failed.";
    }
}

You can also test this locally on your own computer. Then you have to download and unzip the SSISBuild nuget to your Visual Studio solution folder and add one line of code at the top to fill Predefined variable with the solution path on your local computer.
# PowerShell code
$env:BUILD_SOURCESDIRECTORY = "D:\sources\xxxxxxbi\"

Test locally with PowerShell ISE


The PowerShell is very basic at the moment (KISS), but there are some options to extend the possibilities for this PowerShell. These will be handled in a separate post.

5) Copy Files
Now that we have successfully build the project it is time to copy the result, the .ispac file, to the Artifact Staging Directory. Add a new task called Copy Files. Select *.ispac as content and use the Predefined variable build.ArtifactStagingDirectory as Target Folder.
DevOps - Copy ispac file to stage folder


6) Publish Build Artifacts
The last task is to publish the artifact, the . ispac file, so you can use it in a Release pipeline later on. Add a task called Publish Build Artifacts. By default the same Predefined variable build.ArtifactStagingDirectory is used as path to publish. Rename the artifact so that you can easily find it when building the Release pipeline.
DevOps - Publish Build Artifacts


7) Add Triggers
To trigger this build pipeline automatically when changes are committed to the Master branch we need to add a trigger. Go to the triggers menu and enable continuous integration. Then add a path filter so that this build will only trigger when the specific project changes. Then save the Build pipeline and trigger it by committing a change.
DevOps - Enable trigger to build SSIS project


Conclusion
In this post I showed you how to build an SSIS project in Azure DevOps with the SSISBuild NuGet. It took quite a few steps, but most steps are relative simple and easy to replicate in your own DevOps project.

One downside of this method is that it is a bit more strict when building your SSIS project. It could even happen that you can build your project in Visual Studio successfully and even deploy it to the catalog, but that it will fail building when using the SSISBuild Nuget and throwing you this error: ERROR: An item with the same key has already been added.
ERROR: An item with the same key has already been added


The possible cause of this error is duplicate Connection Manager Guids. This happens when you copy a package (with a package connection manager) in Visual Studio. I solved it when recreated the connection manager manually.
If you have duplicate package connection managers and you convert one of them to a project connection manager then it will hide the duplicate connection manager in the copied package, making it very hard to find.

Next step: Deploy your SSIS project


Tuesday, 2 April 2019

Stopping an Integration runtime that is already stopping

Case
My integration runtime is stopping, but it takes already more than an hour and I see errors in the ADF monitor:

Error 1: Last operation 'Stop' get the status 'Failed'. Error Code: PoolDeleteFailedDueToLockOrReference Error Message: Activity ID: a67615ac-94ff-4547-9244-728d3ae5b25e

Error 2: Error Code: VNetResourceGroupLockedDuringStop Error Message: We are unable to clean up unneeded resources when stopping your IR. Please unlock the resource group containing your VNet and/or remove any reference to the resources created for your IR, and then retry to stop your IR.

Error 3: Error Code: IntegrationRuntimeStoppingLongerThanUsual Error Message: Your integration runtime is taking longer than usual to stop, so please retry to stop it.

It suggests to retry to stop the SSISIR, but the start and stop buttons are greyed out. How do I retry the stop?

Stop and start are greyed out


Solution
The Azure portal interface does not support restart at the moment, however you can restart an SSISIR that is already stopping with PowerShell!

#PowerShell code
# Login with your Azure account (popup will open)
Login-AzureRmAccount 

# Your subscription name (needed if you have more than one subscription)
$SubscriptionName = "xxxxxxx"

# Change the current and default Azure subscription
Select-AzureRmSubscription -SubscriptionName $SubscriptionName
Get-AzureRmSubscription -SubscriptionName $SubscriptionName

# Force stopping SSISIR
Stop-AzureRmDataFactoryV2IntegrationRuntime -DataFactoryName "MyDataFactoryNae" -Name "SSISxxxxxxxIR" -ResourceGroupName "MyResourceGroup" -Force


Other steps you should take if the PowerShell does not stop the Integration Runtime:
  1. Check if there are lockes on the Resource Group or individual items (like ADF, VNET or SSISDB).
  2. If you are using a VNET, check whether it works. (Create a new SSISIR and then press validate on the VNET step)
  3. If there are no locks and the VNET is valid, but the Integration Runtime is still stopping then contact the Azure help + support desk either via Twitter of via an official support request in the portal.
1) Check for locks


2) Validate VNET


3) Add support request (in worst case)


Update: there is a new "retry stop" option available. Click on the Author (pencil) button on the left and then on connection in the left bottom corner. Now open the Integration Runtimes tab and click on the new "retry stop" button. (I hope they will add this option in the monitor as well)
Retry stopping the SSIS IR


Sunday, 1 April 2018

Start and stop Integration Runtime in ADF pipeline

Case
You showed me how to schedule a pause and resume of the Integration Runtime (IR) in Azure Automation, but can you also start and stop IR in the Azure Data Factory (ADF) pipeline with one of the activities? This will save the most money possible, especially when you only have one ETL job.
Pause and Resume IR in ADF pipeline


Solution
Yes you can and even better... you can reuse the existing Runbook PowerShell script that pauses and resumes the IR. Instead of scheduling it, which is more appropriate when you have multiple projects to run, we will call the scripts via their webhooks.

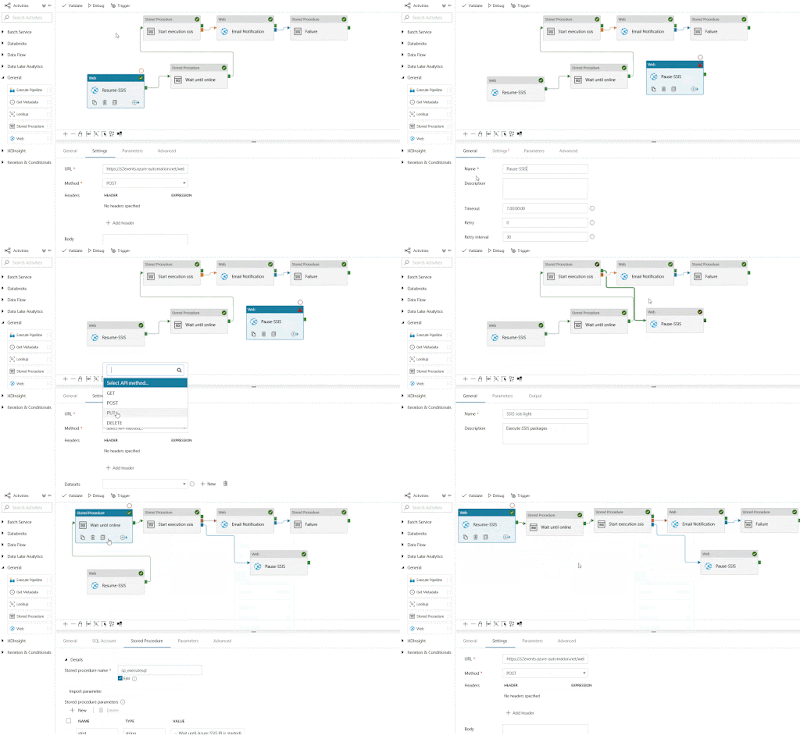
Update: now easier done via Rest API

Prerequisites


A) Azure Automation Runbook
If you already have the two Runbooks that pauses and resumes the IR then you could skip step 1 to 8 and only do step 9 (create webhook) for both scripts. But then make sure to delete, disable or unlink the schedule of the two Runbooks and remove the optional trigger part of the code.

1) Collect parameters
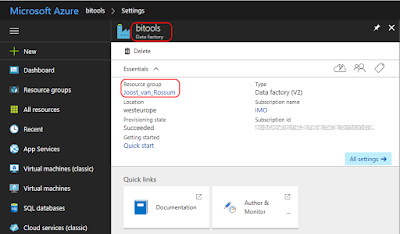
Before we start coding we first we need to get the name of the Azure Data Factory and its Resource group.
Your Azure Data Factory (V2)


2) Azure Automation Account
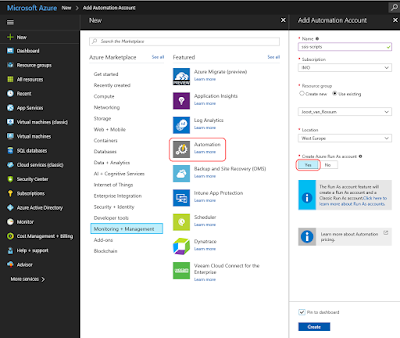
Create an Azure Automation Account. You can find it under + New, Monitoring + Management. Make sure that Create Azure Run As account is turned on.
Azure Automation Account


3) Import Module
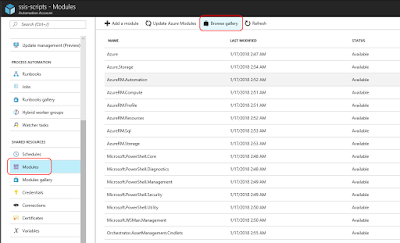
We need to tell our code about Integration Runtimes in Azure Data Factory. You do this by adding a modules. Scroll down in the menu of the Automation Account and click on Module. Now you see all installed modules. We need to add the module called AzureRM.DataFactoryV2, however it depends on AzureRM.Profile (≥ 4.2.0). Click on Browse gallery and search for AzureRM.Profile and import it and then repeat it for AzureRM.DataFactoryV2. Make sure to add the V2 version!
Import modules


4) Connections
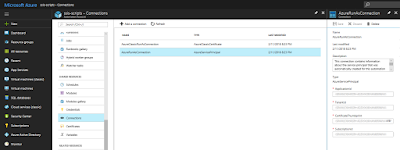
This step is for your information only and to understand the code. Under Connections you will find a default connection named 'AzureRunAsConnection' that contains information about the Azure environment, like the tendant id and the subscription id. To prevent hardcoded connection details we will retrieve some of these fields in the PowerShell code.
AzureRunAsConnection


5) Runbooks
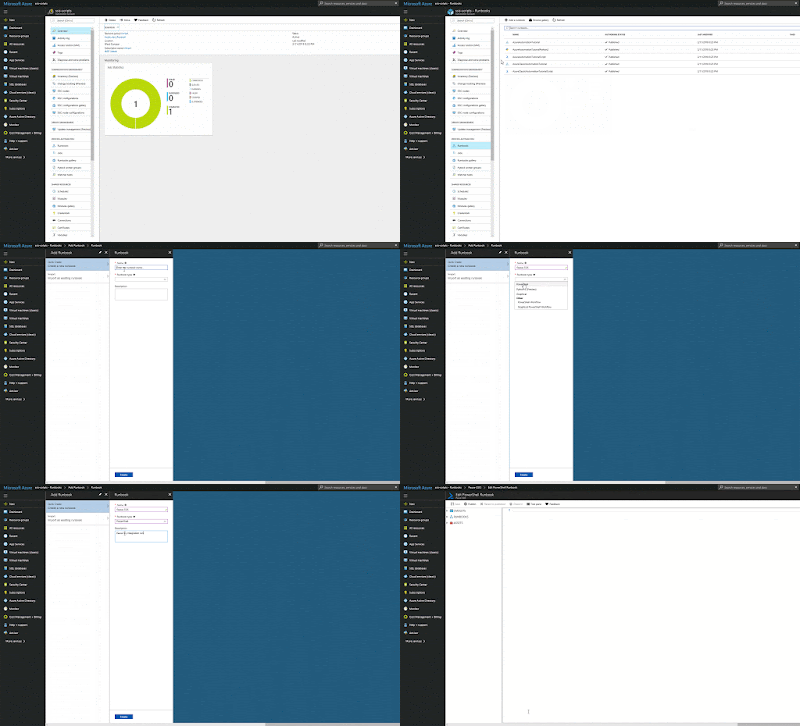
Now it is time to add a new Azure Runbook for the PowerShell code. Click on Runbooks and then add a new runbook (There are also five example runbooks of which AzureAutomationTutorialScript could be useful as an example). Give your new Runbook a suitable name and choose PowerShell as type. There will be two separate runbooks/scripts: one for pause and one for resume. When finished with the Pause script you need to repeat this for the Resume script (steps 5 to 9).
Create new Rubook


6) Edit Script
After clicking Create in the previous step the editor will we opened. When editing an existing Runbook you need to click on the Edit button to edit the code. You can copy and paste the code of one of these scripts below to your editor. Study the green comments to understand the code. Also make sure to fill in the right value for the variables (see parameters).

The first script is the pause script and the second script is the resume script. You could merge both scripts and use an if statement on the status property or some parameters to either pause or resume, but I prefer two separate scripts.

# This scripts pauses your Integration Runtime if it is running

# Parameters
$ConnectionName = 'AzureRunAsConnection'
$DataFactoryName = 'ADF-SSISJoost'
$ResourceGroup = 'joost_van_rossum'

# Do not continue after an error
$ErrorActionPreference = "Stop"

########################################################
# Log in to Azure (standard code)
########################################################
Write-Verbose -Message 'Connecting to Azure'
try
{
    # Get the connection "AzureRunAsConnection "
    $ServicePrincipalConnection = Get-AutomationConnection -Name $ConnectionName         

    'Log in to Azure...'
    $null = Add-AzureRmAccount `
        -ServicePrincipal `
        -TenantId $ServicePrincipalConnection.TenantId `
        -ApplicationId $ServicePrincipalConnection.ApplicationId `
        -CertificateThumbprint $ServicePrincipalConnection.CertificateThumbprint 
}
catch 
{
    if (!$ServicePrincipalConnection)
    {
        # You forgot to turn on 'Create Azure Run As account' 
        $ErrorMessage = "Connection $ConnectionName not found."
        throw $ErrorMessage
    }
    else
    {
        # Something went wrong
        Write-Error -Message $_.Exception.Message
        throw $_.Exception
    }
}
########################################################


# Get Integration Runtime in Azure Data Factory
$IntegrationRuntime = Get-AzureRmDataFactoryV2IntegrationRuntime `
                            -DataFactoryName $DataFactoryName `
                            -ResourceGroupName $ResourceGroup

# Check if Integration Runtime was found
if (!$IntegrationRuntime)
{
    # Your ADF does not have a Integration Runtime
    # or the ADF does not exist
    $ErrorMessage = "No Integration Runtime found in ADF $($DataFactoryName)."
    throw $ErrorMessage
}
# Check if the Integration Runtime is running
elseif ($IntegrationRuntime.State -eq "Started")
{
    # Stop the integration runtime
    Write-Output "Pausing Integration Runtime $($IntegrationRuntime.Name)."
    $null = Stop-AzureRmDataFactoryV2IntegrationRuntime `
                -DataFactoryName $IntegrationRuntime.DataFactoryName `
                -Name $IntegrationRuntime.Name `
                -ResourceGroupName $IntegrationRuntime.ResourceGroupName `
                -Force
    Write-Output "Done"
}
else
{
    # Write message to screen (not throwing error)
    Write-Output "Integration Runtime $($IntegrationRuntime.Name) is not running."
}


# This scripts resumes your Integration Runtime if it is stopped

# Parameters
$ConnectionName = 'AzureRunAsConnection'
$DataFactoryName = 'ADF-SSISJoost'
$ResourceGroup = 'joost_van_rossum'

# Do not continue after an error
$ErrorActionPreference = "Stop"

########################################################
# Log in to Azure (standard code)
########################################################
Write-Verbose -Message 'Connecting to Azure'
try
{
    # Get the connection "AzureRunAsConnection "
    $ServicePrincipalConnection = Get-AutomationConnection -Name $ConnectionName         

    'Log in to Azure...'
    $null = Add-AzureRmAccount `
        -ServicePrincipal `
        -TenantId $ServicePrincipalConnection.TenantId `
        -ApplicationId $ServicePrincipalConnection.ApplicationId `
        -CertificateThumbprint $ServicePrincipalConnection.CertificateThumbprint 
}
catch 
{
    if (!$ServicePrincipalConnection)
    {
        # You forgot to turn on 'Create Azure Run As account' 
        $ErrorMessage = "Connection $ConnectionName not found."
        throw $ErrorMessage
    }
    else
    {
        # Something went wrong
        Write-Error -Message $_.Exception.Message
        throw $_.Exception
    }
}
########################################################


# Get Integration Runtime in Azure Data Factory
$IntegrationRuntime = Get-AzureRmDataFactoryV2IntegrationRuntime `
                            -DataFactoryName $DataFactoryName `
                            -ResourceGroupName $ResourceGroup

# Check if Integration Runtime was found
if (!$IntegrationRuntime)
{
    # Your ADF does not have a Integration Runtime
    # or the ADF does not exist
    $ErrorMessage = "No Integration Runtime found in ADF $($DataFactoryName)."
    throw $ErrorMessage
}
# Check if the Integration Runtime is running
elseif ($IntegrationRuntime.State -ne "Started")
{
    # Resume the integration runtime
    Write-Output "Resuming Integration Runtime $($IntegrationRuntime.Name)."
    $null = Start-AzureRmDataFactoryV2IntegrationRuntime `
                -DataFactoryName $IntegrationRuntime.DataFactoryName `
                -Name $IntegrationRuntime.Name `
                -ResourceGroupName $IntegrationRuntime.ResourceGroupName `
                -Force
    Write-Output "Done"
}
else
{
    # Write message to screen (not throwing error)
    Write-Output "Integration Runtime $($IntegrationRuntime.Name) is already running."
}

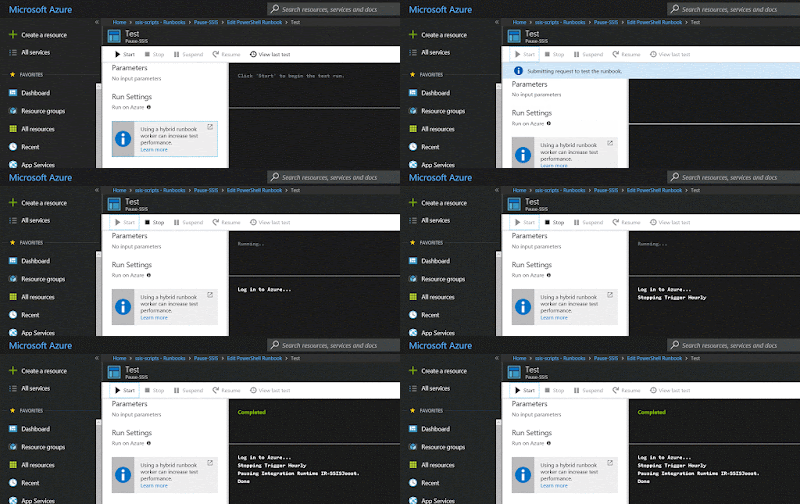
7) Testing
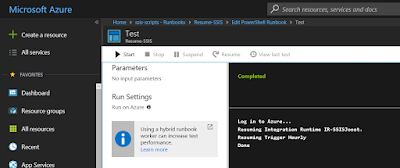
You can use the Test Pane menu option in the editor to test your PowerShell scripts. When clicking on Run it will first Queue the script before Starting it. Running takes a couple of minutes.
Pausing Integration Runtime


Resuming Integration Runtime (20 minutes+)


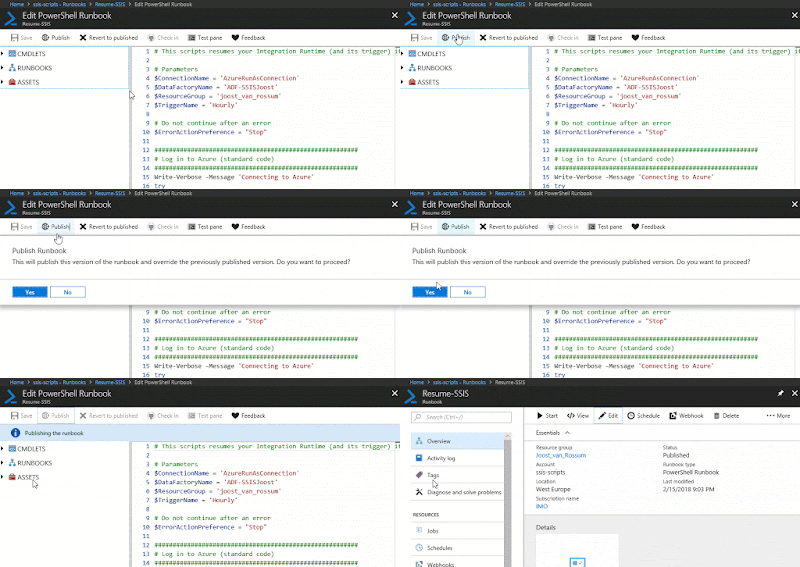
8) Publish
When your script is ready, it is time to publish it. Above the editor click on the Publish button. Confirm overriding any previously published versions.
Publish your script


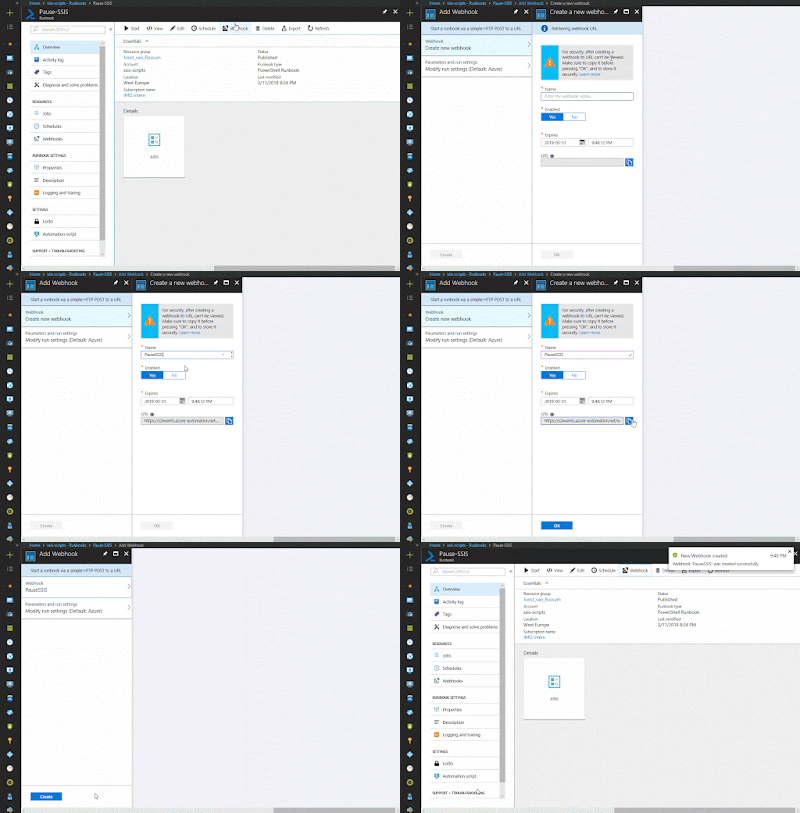
9) Adding a Webhook
To start the runbooks we will be using a Webhook. This is a URL with a long key in it. Do not share this URL, because with it others could execute your runbook. Treat it like a password.
On the Runbook overview page click on Webhook and create a new Webhook. Give it a suitable name (that is similar to its runbook). Set the expiration date and don't forget the copy the URL. This is the only time you can see the URL. If you loose it you need to recreate the Webhook. The URL looks something like: https://s2events.azure-automation.net/webhooks?token=vfIx%2fOAHcsJCn95abSXbklPrPXNlFUHwpr%2bSWyANlk0%3d
Add Webhook


B) Azure Data Factory
The scripts are now ready. Next go to your existing ADF pipeline that executes the SSIS package. We will be adding two activities before executing the package and one behind it.


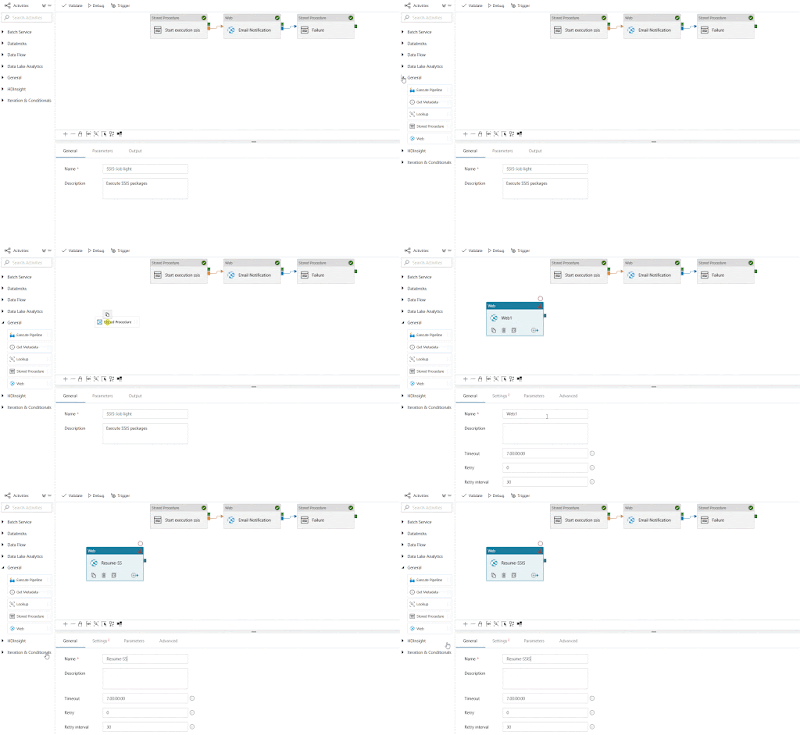
1) Resume IR Add Web Activity
Next collapse the General activities and drag a Web activity as first activity in your pipeline. This activity will be calling the Webhook of the Resume-SSIS runbook. Give it a suitable name like 'Resume-SSIS'.
Add Web Activity for Resume IR


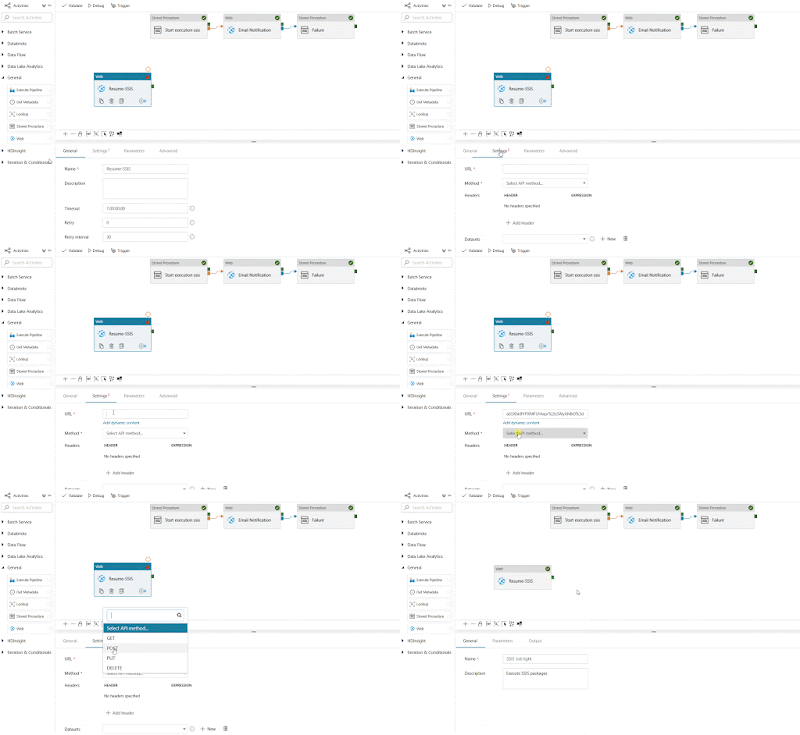
2) Resume IR Web activity settings
Select the newly added Web activity and go to the Settings page. In the URL field you must paste the URL from step A9 (the URL/Webhook that resumes the IR) and as method you need to select Post.
Add Webhook URL


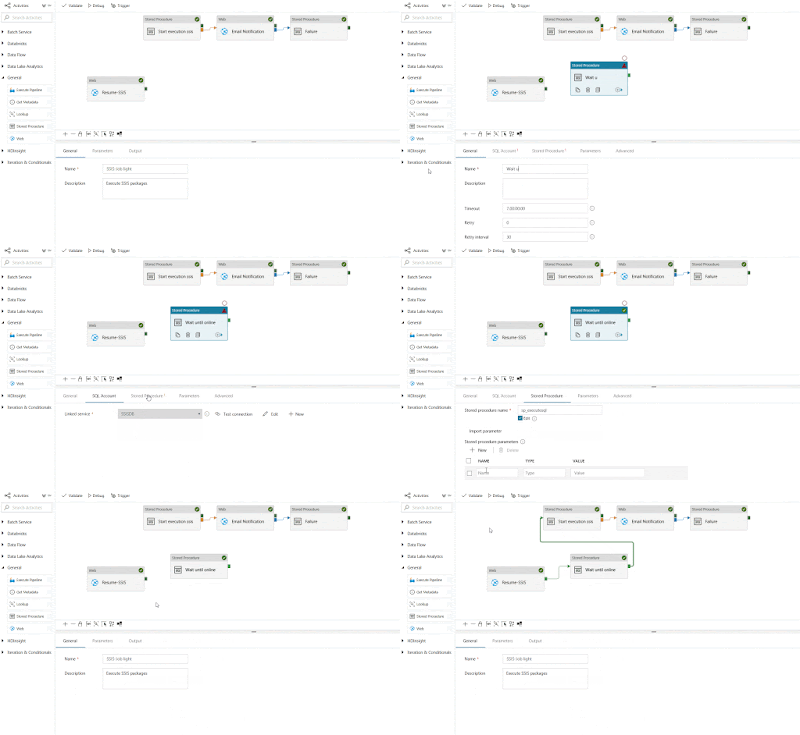
3) Wait until online Stored Procedure
Because calling the Webhook is asynchronous (don't wait for the result) and starting the IR takes 15 to 20 minutes we need to wait that amount of time. The database view [catalog].[worker_agents] in the SSISDB database will tell you when the IR is active.

In the SQL Account tab you can select the existing connection to the SSISDB. Then go to the Stored Procedure tab and add 'sp_executesql' as Stored procedure name. Next add a string parameter called stmt (statement) and paste the code below as value.

When finished connect the Resume-SSIS activity to this new Wait activity and then connect the Wait activity to the activity that executes the package.
-- Wait until Azure-SSIS IR is started
WHILE NOT EXISTS (SELECT * FROM [SSISDB].[catalog].[worker_agents] WHERE IsEnabled = 1 AND LastOnlineTime > DATEADD(MINUTE, -1, SYSDATETIMEOFFSET()))
BEGIN
    WAITFOR DELAY '00:00:30';
END
Add wait


Tip: add a 30 minute time-out on this activity to prevent endless waiting in case of unexpected errors.

4) Pause IR Web Activity
Last step is to add an other Web activity called Pause-SSIS. This is similar to the Resume-SSIS activity, but with an other Webhook URL. When finished connect the activity that executes the package to this new Pause activity. Make sure to change it from the default Success to Completion. Otherwise the IR keeps on running in case a package fails.

The only thing left is some realignment and then you can publish and test your ADF pipeline.
Add Web Activity for Pausing IR


5) Test result
If you run the pipeline and check its activities in the monitor you see all the individual steps. Starting the IR took almost 25 minutes of the 32 minutes in total. So now you only have to pay for the 32 minutes.
Activities


Summary
In this post I showed you how to pause and resume the Integration Runtime in the ADF pipeline. This is especially useful if you only have one job or just a few that don't run at the same time. For all other cases I recommend to schedule pause and resume.

Thursday, 15 February 2018

Pause and resume Integration Runtime to save money

Case
Azure Data Factory (V2) now supports running SSIS packages in an Integration Runtime, but you are charged by the hour. How can I automatically pause (and resume) my SSIS environment in Azure to save some money on my Azure bill?
Pause your Integration Runtime in the portal


Solution
For this example I'm using an Integration Runtime (IR) that runs an SSIS package each hour during working hours. After working hour it is no longer necessary to refresh the data warehouse. Therefore the IR could be suspended to save money. I will also suspend the trigger that runs the pipeline (package) each hour to prevent errors. For this solution I will use a PowerShell script that runs in an Azure Automation Runbook.

1) Collect parameters
Before we start coding we first we need to get the name of the Azure Data Factory and its Resource group.
Your Azure Data Factory (V2)


If you also want to disable the trigger then we need its name. This is probably only necessary if you are running hourly and didn't create separate triggers for each hour. You can find it by clicking on Author & Monitor under Quick links.
Your trigger


2) Azure Automation Account
Create an Azure Automation Account. You can find it under + New, Monitoring + Management. Make sure that Create Azure Run As account is turned on.
Azure Automation Account


3) Import Module
We need to tell our code about Integration Runtimes in Azure Data Factory. You do this by adding a modules. Scroll down in the menu of the Automation Account and click on Module. Now you see all installed modules. We need to add the module called AzureRM.DataFactoryV2, however it depends on AzureRM.Profile (≥ 4.2.0). Click on Browse gallery and search for AzureRM.Profile and import it and then repeat it for AzureRM.DataFactoryV2. Make sure to add the V2 version!
Import modules


4) Connections
This step is for your information only and to understand the code. Under Connections you will find a default connection named 'AzureRunAsConnection' that contains information about the Azure environment, like the tendant id and the subscription id. To prevent hardcoded connection details we will retrieve some of these fields in the PowerShell code.
AzureRunAsConnection


5) Runbooks
Now it is time to add a new Azure Runbook for the PowerShell code. Click on Runbooks and then add a new runbook (There are also five example runbooks of which AzureAutomationTutorialScript could be useful as an example). Give your new Runbook a suitable name and choose PowerShell as type. There will be two separate runbooks/scripts: one for pause and one for resume. When finished with the Pause script you need to repeat this for the Resume script.
Create new Rubook


6) Edit Script
After clicking Create in the previous step the editor will we opened. When editing an existing Runbook you need to click on the Edit button to edit the code. You can copy and paste the code of one of these scripts below to your editor. Study the green comments to understand the code. Also make sure to fill in the right value for the variables (see parameters).

The first script is the pause script and the second script is the resume script. You could merge both scripts and use an if statement on the status property to either pause or resume, but I prefer two separate scripts both with their own schedule.

# This scripts pauses your Integration Runtime (and its trigger) if it is running

# Parameters
$ConnectionName = 'AzureRunAsConnection'
$DataFactoryName = 'ADF-SSISJoost'
$ResourceGroup = 'joost_van_rossum'
$TriggerName = 'Hourly'

# Do not continue after an error
$ErrorActionPreference = "Stop"

########################################################
# Log in to Azure (standard code)
########################################################
Write-Verbose -Message 'Connecting to Azure'
try
{
    # Get the connection "AzureRunAsConnection "
    $ServicePrincipalConnection = Get-AutomationConnection -Name $ConnectionName         

    'Log in to Azure...'
    $null = Add-AzureRmAccount `
        -ServicePrincipal `
        -TenantId $ServicePrincipalConnection.TenantId `
        -ApplicationId $ServicePrincipalConnection.ApplicationId `
        -CertificateThumbprint $ServicePrincipalConnection.CertificateThumbprint 
}
catch 
{
    if (!$ServicePrincipalConnection)
    {
        # You forgot to turn on 'Create Azure Run As account' 
        $ErrorMessage = "Connection $ConnectionName not found."
        throw $ErrorMessage
    }
    else
    {
        # Something went wrong
        Write-Error -Message $_.Exception.Message
        throw $_.Exception
    }
}
########################################################


# Get Integration Runtime in Azure Data Factory
$IntegrationRuntime = Get-AzureRmDataFactoryV2IntegrationRuntime `
                            -DataFactoryName $DataFactoryName `
                            -ResourceGroupName $ResourceGroup

# Check if Integration Runtime was found
if (!$IntegrationRuntime)
{
    # Your ADF does not have a Integration Runtime
    # or the ADF does not exist
    $ErrorMessage = "No Integration Runtime found in ADF $($DataFactoryName)."
    throw $ErrorMessage
}
# Check if the Integration Runtime is running
elseif ($IntegrationRuntime.State -eq "Started")
{
    <# Start Trigger Deactivation #>
    # Getting trigger to check if it exists
    $Trigger = Get-AzureRmDataFactoryV2Trigger `
  -DataFactoryName $DataFactoryName `
  -Name $TriggerName `
  -ResourceGroupName $ResourceGroup

    # Check if the trigger was found
    if (!$Trigger)
    {
        # Fail options:
        # The ADF does not exist (typo)
        # The trigger does not exist (typo)
        $ErrorMessage = "Trigger $($TriggerName) not found."
        throw $ErrorMessage
    }
    # Check if the trigger is activated
    elseif ($Trigger.RuntimeState -eq "Started")
    {
        Write-Output "Stopping Trigger $($TriggerName)"
        $null = Stop-AzureRmDataFactoryV2Trigger `
                    -DataFactoryName $DataFactoryName `
                    -Name $TriggerName `
                    -ResourceGroupName $ResourceGroup `
                    -Force
    }
    else
    {
        # Write message to screen (not throwing error)
        Write-Output "Trigger $($TriggerName) is not activated."
    }
    <# End Trigger Deactivation #>

    # Stop the integration runtime
    Write-Output "Pausing Integration Runtime $($IntegrationRuntime.Name)."
    $null = Stop-AzureRmDataFactoryV2IntegrationRuntime `
                -DataFactoryName $IntegrationRuntime.DataFactoryName `
                -Name $IntegrationRuntime.Name `
                -ResourceGroupName $IntegrationRuntime.ResourceGroupName `
                -Force
    Write-Output "Done"
}
else
{
    # Write message to screen (not throwing error)
    Write-Output "Integration Runtime $($IntegrationRuntime.Name) is not running."
}


# This scripts resumes your Integration Runtime (and its trigger) if it is stopped

# Parameters
$ConnectionName = 'AzureRunAsConnection'
$DataFactoryName = 'ADF-SSISJoost'
$ResourceGroup = 'joost_van_rossum'
$TriggerName = 'Hourly'

# Do not continue after an error
$ErrorActionPreference = "Stop"

########################################################
# Log in to Azure (standard code)
########################################################
Write-Verbose -Message 'Connecting to Azure'
try
{
    # Get the connection "AzureRunAsConnection "
    $ServicePrincipalConnection = Get-AutomationConnection -Name $ConnectionName         

    'Log in to Azure...'
    $null = Add-AzureRmAccount `
        -ServicePrincipal `
        -TenantId $ServicePrincipalConnection.TenantId `
        -ApplicationId $ServicePrincipalConnection.ApplicationId `
        -CertificateThumbprint $ServicePrincipalConnection.CertificateThumbprint 
}
catch 
{
    if (!$ServicePrincipalConnection)
    {
        # You forgot to turn on 'Create Azure Run As account' 
        $ErrorMessage = "Connection $ConnectionName not found."
        throw $ErrorMessage
    }
    else
    {
        # Something went wrong
        Write-Error -Message $_.Exception.Message
        throw $_.Exception
    }
}
########################################################


# Get Integration Runtime in Azure Data Factory
$IntegrationRuntime = Get-AzureRmDataFactoryV2IntegrationRuntime `
                            -DataFactoryName $DataFactoryName `
                            -ResourceGroupName $ResourceGroup

# Check if Integration Runtime was found
if (!$IntegrationRuntime)
{
    # Your ADF does not have a Integration Runtime
    # or the ADF does not exist
    $ErrorMessage = "No Integration Runtime found in ADF $($DataFactoryName)."
    throw $ErrorMessage
}
# Check if the Integration Runtime is running
elseif ($IntegrationRuntime.State -ne "Started")
{
    # Resume the integration runtime
    Write-Output "Resuming Integration Runtime $($IntegrationRuntime.Name)."
    $null = Start-AzureRmDataFactoryV2IntegrationRuntime `
                -DataFactoryName $IntegrationRuntime.DataFactoryName `
                -Name $IntegrationRuntime.Name `
                -ResourceGroupName $IntegrationRuntime.ResourceGroupName `
                -Force
    Write-Output "Done"
}
else
{
    # Write message to screen (not throwing error)
    Write-Output "Integration Runtime $($IntegrationRuntime.Name) is already running."
}

<# Start Trigger Activation #>
# Getting trigger to check if it exists
$Trigger = Get-AzureRmDataFactoryV2Trigger `
    -DataFactoryName $DataFactoryName `
    -Name $TriggerName `
    -ResourceGroupName $ResourceGroup

# Check if the trigger was found
if (!$Trigger)
{
    # Fail options:
    # The ADF does not exist (typo)
    # The trigger does not exist (typo)
    $ErrorMessage = "Trigger $($TriggerName) not found."
    throw $ErrorMessage
}
# Check if the trigger is activated
elseif ($Trigger.RuntimeState -ne "Started")
{
    Write-Output "Resuming Trigger $($TriggerName)"
    $null = Start-AzureRmDataFactoryV2Trigger `
                -DataFactoryName $DataFactoryName `
                -Name $TriggerName `
                -ResourceGroupName $ResourceGroup `
                -Force
}
else
{
    # Write message to screen (not throwing error)
    Write-Output "Trigger $($TriggerName) is already activated."
}
<# End Trigger Deactivation #>

Note: when you don't want to disable your trigger then remove the lines between <# Start Trigger Deactivation #> and <# End Trigger Deactivation #>.

7) Testing
You can use the Test Pane menu option in the editor to test your PowerShell scripts. When clicking on Run it will first Queue the script before Starting it. Running takes a couple of minutes.
Pausing Integration Runtime


Resuming Integration Runtime (20 minutes+)


8) Publish
When your script is ready, it is time to publish it. Above the editor click on the Publish button. Confirm overriding any previously published versions.
Publish your script


9) Schedule
And now that we have a working and published Azure Runbook, we need to schedule it. Click on Schedule to create a new schedule for your runbook. My packages run each hour during working hours. So for the resume script I created a schedule that runs every working day on 7:00AM. The pause script could for example be scheduled on working days at 9:00PM (21:00).
Now you need to hit the refresh button in the Azure Data Factory dashboard to see if it really works. It takes a few minutes to run, so don't worry too soon.
Add schedule


Summary
In this post you saw how you can pause and resume your Integration Runtime in ADF to save some money on your Azure bill during the quiet hours. As said before pausing and resuming the trigger is optional. When creating the schedule, keep in mind that resuming/starting takes around 20 minutes to finish and note that you also pay during this startup phase.
Steps 5 to 9 need to be repeated for the resume script after you finished the pause script.

Update: you can also do a pause and resume in the pipeline itself if you only have one ETL job.

Update 2: now even easier done via Rest API
Related Posts Plugin for WordPress, Blogger...