Monday 29 October 2018

Bug: Script Task - Cannot load script for execution

Case
My Script Tasks are running fine in Visual Studio 2017, but when deployed to the catalog I get an error in all Script Tasks: Cannot load script for execution
Error: Cannot load script for execution


Solution
There is a bug in SSDT for Visual Studio 2017 (15.8.1). The (temporary) workaround is to NOT use SSDT 2017 for deployment. Instead you could use SSMS to deploy your SSIS projects.
Deploy packages with SSMS


Or use ISDeploymentWizard.exe in the folder C:\Program Files (x86)\Microsoft Visual Studio\2017\SQL\Common7\IDE\CommonExtensions\Microsoft\SSIS\150\Binn\  to deploy your projects.

Expect an update soon!


UPDATE: SSDT 15.8.2 is available
Fixed an issue that deploying SSIS project which contains packages containing Script Task/Flat file destination to Azure-SSIS will result in the packages failing to execute in Azure-SSIS


Saturday 30 June 2018

The database 'SSISDB' has reached its size quota.

Case
I'm running SSIS in azure for couple of months now, but I'm getting an error: The database 'SSISDB' has reached its size quota. Partition or delete data, drop indexes, or consult the documentation for possible resolutions. The SQL Server Agent jobs that are scheduled to clean up the log and project versions are not available in Azure.

The first time it occurred I scaled up the database tier and that solved the problem, but now it reoccurs and I don't want to keep scaling up the database tier. How do I solve this?


Solution
Since there is no SQL Server agent there are no jobs available, but there will be a solution within a couple of weeks. If you can't wait there is a workaround. First make sure the retention period and number of project versions are set to an acceptable level. If you are running and updating packages frequently then the default settings are probably a bit to high.
The default settings (right click SSISDB to see properties)


Project versions
I set the Maximom Number of Versions per Project to 3. The clean up the old project version locate the Stored Procedure (SSISDB) [internal].[cleanup_server_project_version] and execute it. There are no parameters.
Before and after running the Stored Procedure


Log retention
The same can be done for the Log retention with the stored procedure [internal].[cleanup_server_retention_window]. Again no parameters. The Stored Procedure is working with a T-SQL cursor so if your log is massive and your server very busy it could take a while.


You could even schedule these Stored Procedures with for example Azure Data Factory to clean up regularly, but keep up the SSIS announcements to see when they implement a out-of-the box solution.


Thursday 31 May 2018

User Group meeting: SSIS in the cloud

Recently I presented an SSIS in the Cloud session at a User Group evening in Amsterdam, The Netherlands. Thank you QNH for hosting that evening. You can download the PowerPoint and in the comments you will find the blogposts that I used in my demo's.


Saturday 14 April 2018

New ADF Pipeline activity: Execute SSIS Package

Case
Microsoft released a new ADF Pipeline activity today: Execute SSIS Package. How does it work and is it easier/better than the trick with the Stored Procedure Activity?


Solution
The new activity can be found under General (just like the Stored Procedure) and it is indeed much easier than the Stored Procedure activity solution. If you want to execute the  package below then follow the steps below.
The package which I want to execute


1) Add activity 
Drag the new SSIS activity to the canvas of the pipeline and give it a describing name. For example something with the projectname of package name in it.
Execute SSIS Package activity


2) Settings
Go to the Settings tab and first select the name of the Integration Runtime that should execute the package. The second mandatory setting is the Logging Level, but it already has a default setting for 'Basic' and the last mandatory setting is the package path. The path starts with the catalog folder name followed by a forward slash, the project name, an other forward slash and then finally the package name. It shoud look like this: ssisjoost/MyAzureProject/Package.dtsx
Settings


3) Run Trigger
Now run publish the new pipline and run the trigger to see the result.

Possible errors:
When the Integration Runtime is not running, it shows "Activity Execute my first package failed: The integration runtime 'IR-SSISJoost' under data factory 'ADF-SSISJoost' does not exist.". This message is a bit strange.

When the Integration Runtime is starting up, it shows "Activity Execute my first package failed: The state of Azure ssis integration runtime 'IR-SSISJoost' under data factory 'ADF-SSISJoost' is not ready."

When the package is failing it shows "Execute my first package failed: Package execution failed.". This shows the shortcoming compared to the Stores Procedure activity which allows you to show the Execution Id and even the error messages from the catalog if you fancy a bit of T-SQL scripting.

Conclusion
Much easier, but in case of package errors not very helpful. It forces you to search for errors in the catalog. If you are using the ADF monitor to the check for errors I would probably still prefer the Stores Procedure activity.


Sunday 1 April 2018

Start and stop Integration Runtime in ADF pipeline

Case
You showed me how to schedule a pause and resume of the Integration Runtime (IR) in Azure Automation, but can you also start and stop IR in the Azure Data Factory (ADF) pipeline with one of the activities? This will save the most money possible, especially when you only have one ETL job.
Pause and Resume IR in ADF pipeline


Solution
Yes you can and even better... you can reuse the existing Runbook PowerShell script that pauses and resumes the IR. Instead of scheduling it, which is more appropriate when you have multiple projects to run, we will call the scripts via their webhooks.

Update: now easier done via Rest API

Prerequisites


A) Azure Automation Runbook
If you already have the two Runbooks that pauses and resumes the IR then you could skip step 1 to 8 and only do step 9 (create webhook) for both scripts. But then make sure to delete, disable or unlink the schedule of the two Runbooks and remove the optional trigger part of the code.

1) Collect parameters
Before we start coding we first we need to get the name of the Azure Data Factory and its Resource group.
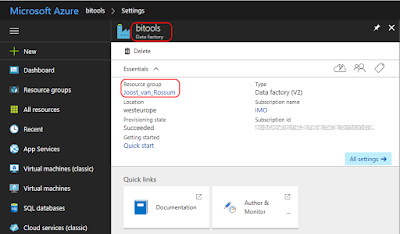
Your Azure Data Factory (V2)


2) Azure Automation Account
Create an Azure Automation Account. You can find it under + New, Monitoring + Management. Make sure that Create Azure Run As account is turned on.
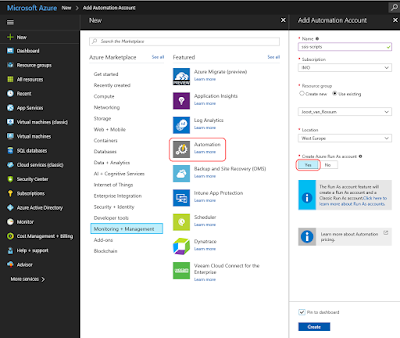
Azure Automation Account


3) Import Module
We need to tell our code about Integration Runtimes in Azure Data Factory. You do this by adding a modules. Scroll down in the menu of the Automation Account and click on Module. Now you see all installed modules. We need to add the module called AzureRM.DataFactoryV2, however it depends on AzureRM.Profile (≥ 4.2.0). Click on Browse gallery and search for AzureRM.Profile and import it and then repeat it for AzureRM.DataFactoryV2. Make sure to add the V2 version!
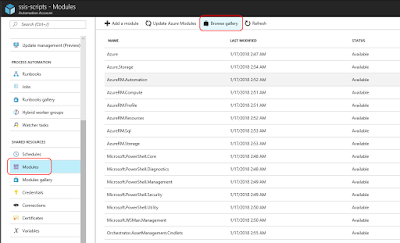
Import modules


4) Connections
This step is for your information only and to understand the code. Under Connections you will find a default connection named 'AzureRunAsConnection' that contains information about the Azure environment, like the tendant id and the subscription id. To prevent hardcoded connection details we will retrieve some of these fields in the PowerShell code.
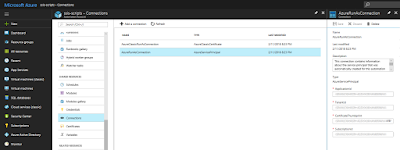
AzureRunAsConnection


5) Runbooks
Now it is time to add a new Azure Runbook for the PowerShell code. Click on Runbooks and then add a new runbook (There are also five example runbooks of which AzureAutomationTutorialScript could be useful as an example). Give your new Runbook a suitable name and choose PowerShell as type. There will be two separate runbooks/scripts: one for pause and one for resume. When finished with the Pause script you need to repeat this for the Resume script (steps 5 to 9).
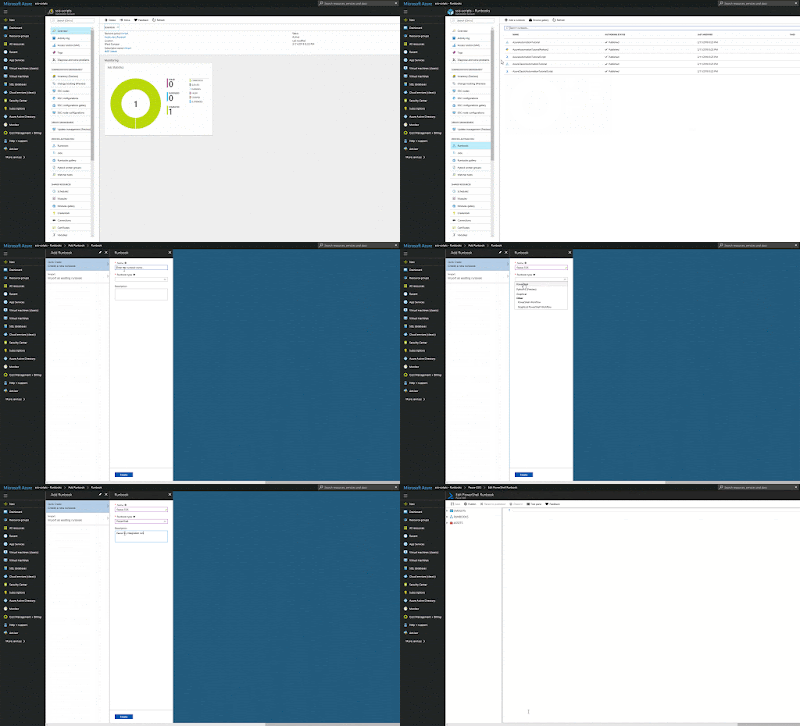
Create new Rubook


6) Edit Script
After clicking Create in the previous step the editor will we opened. When editing an existing Runbook you need to click on the Edit button to edit the code. You can copy and paste the code of one of these scripts below to your editor. Study the green comments to understand the code. Also make sure to fill in the right value for the variables (see parameters).

The first script is the pause script and the second script is the resume script. You could merge both scripts and use an if statement on the status property or some parameters to either pause or resume, but I prefer two separate scripts.

# This scripts pauses your Integration Runtime if it is running

# Parameters
$ConnectionName = 'AzureRunAsConnection'
$DataFactoryName = 'ADF-SSISJoost'
$ResourceGroup = 'joost_van_rossum'

# Do not continue after an error
$ErrorActionPreference = "Stop"

########################################################
# Log in to Azure (standard code)
########################################################
Write-Verbose -Message 'Connecting to Azure'
try
{
    # Get the connection "AzureRunAsConnection "
    $ServicePrincipalConnection = Get-AutomationConnection -Name $ConnectionName         

    'Log in to Azure...'
    $null = Add-AzureRmAccount `
        -ServicePrincipal `
        -TenantId $ServicePrincipalConnection.TenantId `
        -ApplicationId $ServicePrincipalConnection.ApplicationId `
        -CertificateThumbprint $ServicePrincipalConnection.CertificateThumbprint 
}
catch 
{
    if (!$ServicePrincipalConnection)
    {
        # You forgot to turn on 'Create Azure Run As account' 
        $ErrorMessage = "Connection $ConnectionName not found."
        throw $ErrorMessage
    }
    else
    {
        # Something went wrong
        Write-Error -Message $_.Exception.Message
        throw $_.Exception
    }
}
########################################################


# Get Integration Runtime in Azure Data Factory
$IntegrationRuntime = Get-AzureRmDataFactoryV2IntegrationRuntime `
                            -DataFactoryName $DataFactoryName `
                            -ResourceGroupName $ResourceGroup

# Check if Integration Runtime was found
if (!$IntegrationRuntime)
{
    # Your ADF does not have a Integration Runtime
    # or the ADF does not exist
    $ErrorMessage = "No Integration Runtime found in ADF $($DataFactoryName)."
    throw $ErrorMessage
}
# Check if the Integration Runtime is running
elseif ($IntegrationRuntime.State -eq "Started")
{
    # Stop the integration runtime
    Write-Output "Pausing Integration Runtime $($IntegrationRuntime.Name)."
    $null = Stop-AzureRmDataFactoryV2IntegrationRuntime `
                -DataFactoryName $IntegrationRuntime.DataFactoryName `
                -Name $IntegrationRuntime.Name `
                -ResourceGroupName $IntegrationRuntime.ResourceGroupName `
                -Force
    Write-Output "Done"
}
else
{
    # Write message to screen (not throwing error)
    Write-Output "Integration Runtime $($IntegrationRuntime.Name) is not running."
}


# This scripts resumes your Integration Runtime if it is stopped

# Parameters
$ConnectionName = 'AzureRunAsConnection'
$DataFactoryName = 'ADF-SSISJoost'
$ResourceGroup = 'joost_van_rossum'

# Do not continue after an error
$ErrorActionPreference = "Stop"

########################################################
# Log in to Azure (standard code)
########################################################
Write-Verbose -Message 'Connecting to Azure'
try
{
    # Get the connection "AzureRunAsConnection "
    $ServicePrincipalConnection = Get-AutomationConnection -Name $ConnectionName         

    'Log in to Azure...'
    $null = Add-AzureRmAccount `
        -ServicePrincipal `
        -TenantId $ServicePrincipalConnection.TenantId `
        -ApplicationId $ServicePrincipalConnection.ApplicationId `
        -CertificateThumbprint $ServicePrincipalConnection.CertificateThumbprint 
}
catch 
{
    if (!$ServicePrincipalConnection)
    {
        # You forgot to turn on 'Create Azure Run As account' 
        $ErrorMessage = "Connection $ConnectionName not found."
        throw $ErrorMessage
    }
    else
    {
        # Something went wrong
        Write-Error -Message $_.Exception.Message
        throw $_.Exception
    }
}
########################################################


# Get Integration Runtime in Azure Data Factory
$IntegrationRuntime = Get-AzureRmDataFactoryV2IntegrationRuntime `
                            -DataFactoryName $DataFactoryName `
                            -ResourceGroupName $ResourceGroup

# Check if Integration Runtime was found
if (!$IntegrationRuntime)
{
    # Your ADF does not have a Integration Runtime
    # or the ADF does not exist
    $ErrorMessage = "No Integration Runtime found in ADF $($DataFactoryName)."
    throw $ErrorMessage
}
# Check if the Integration Runtime is running
elseif ($IntegrationRuntime.State -ne "Started")
{
    # Resume the integration runtime
    Write-Output "Resuming Integration Runtime $($IntegrationRuntime.Name)."
    $null = Start-AzureRmDataFactoryV2IntegrationRuntime `
                -DataFactoryName $IntegrationRuntime.DataFactoryName `
                -Name $IntegrationRuntime.Name `
                -ResourceGroupName $IntegrationRuntime.ResourceGroupName `
                -Force
    Write-Output "Done"
}
else
{
    # Write message to screen (not throwing error)
    Write-Output "Integration Runtime $($IntegrationRuntime.Name) is already running."
}

7) Testing
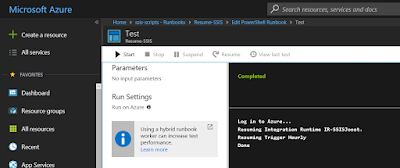
You can use the Test Pane menu option in the editor to test your PowerShell scripts. When clicking on Run it will first Queue the script before Starting it. Running takes a couple of minutes.
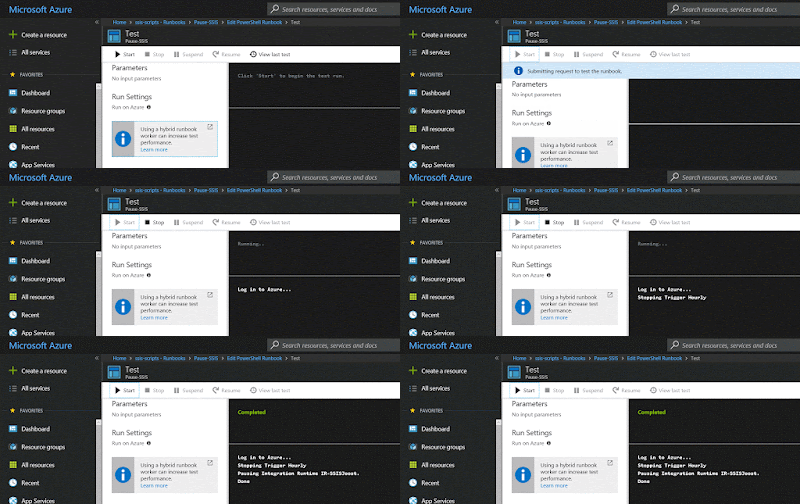
Pausing Integration Runtime


Resuming Integration Runtime (20 minutes+)


8) Publish
When your script is ready, it is time to publish it. Above the editor click on the Publish button. Confirm overriding any previously published versions.
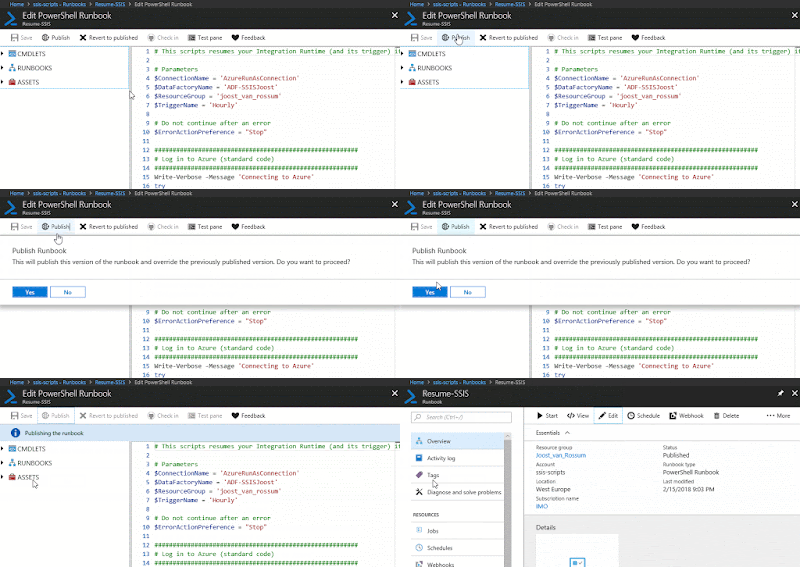
Publish your script


9) Adding a Webhook
To start the runbooks we will be using a Webhook. This is a URL with a long key in it. Do not share this URL, because with it others could execute your runbook. Treat it like a password.
On the Runbook overview page click on Webhook and create a new Webhook. Give it a suitable name (that is similar to its runbook). Set the expiration date and don't forget the copy the URL. This is the only time you can see the URL. If you loose it you need to recreate the Webhook. The URL looks something like: https://s2events.azure-automation.net/webhooks?token=vfIx%2fOAHcsJCn95abSXbklPrPXNlFUHwpr%2bSWyANlk0%3d
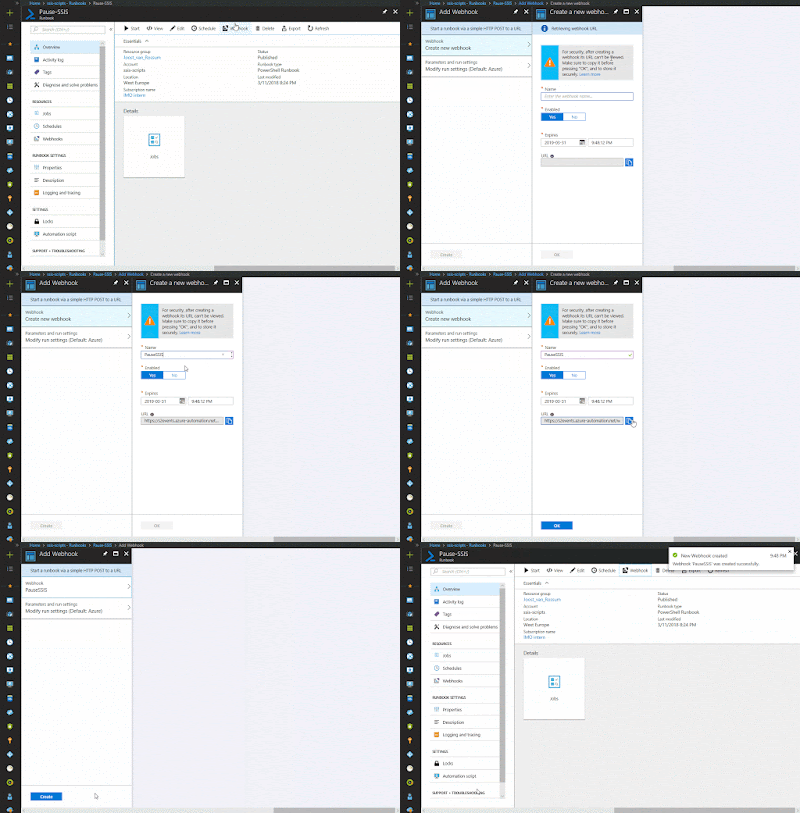
Add Webhook


B) Azure Data Factory
The scripts are now ready. Next go to your existing ADF pipeline that executes the SSIS package. We will be adding two activities before executing the package and one behind it.


1) Resume IR Add Web Activity
Next collapse the General activities and drag a Web activity as first activity in your pipeline. This activity will be calling the Webhook of the Resume-SSIS runbook. Give it a suitable name like 'Resume-SSIS'.
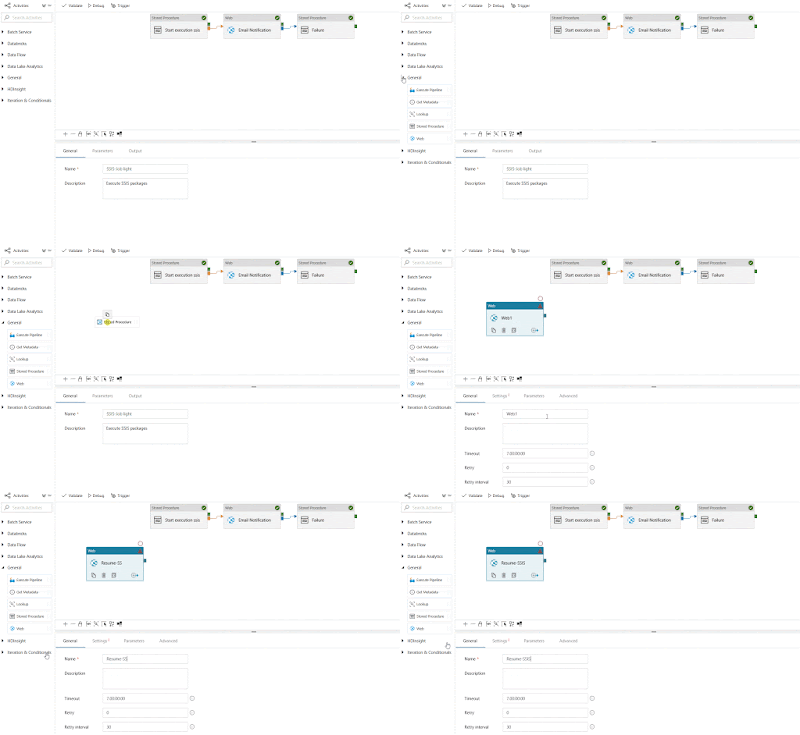
Add Web Activity for Resume IR


2) Resume IR Web activity settings
Select the newly added Web activity and go to the Settings page. In the URL field you must paste the URL from step A9 (the URL/Webhook that resumes the IR) and as method you need to select Post.
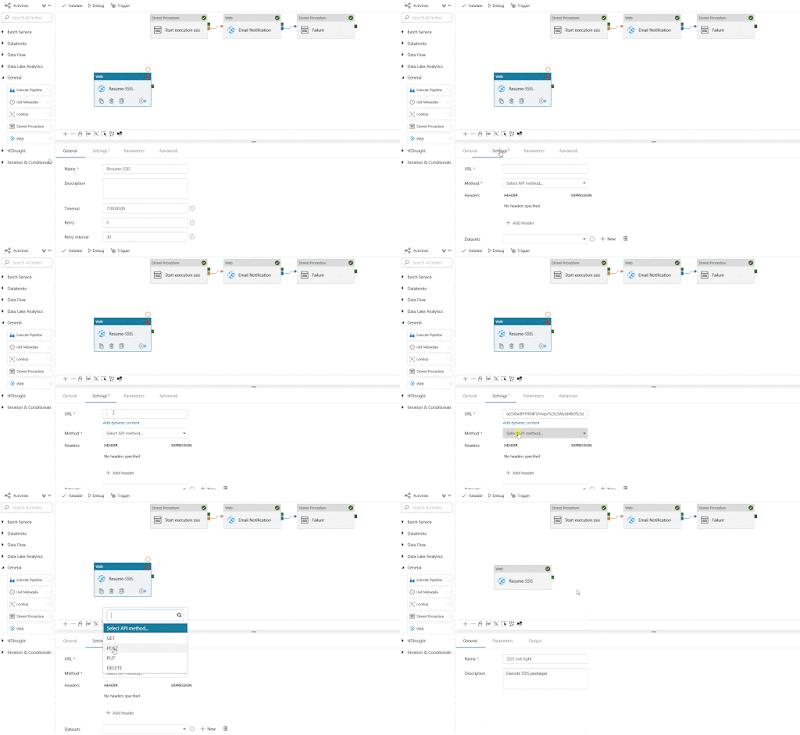
Add Webhook URL


3) Wait until online Stored Procedure
Because calling the Webhook is asynchronous (don't wait for the result) and starting the IR takes 15 to 20 minutes we need to wait that amount of time. The database view [catalog].[worker_agents] in the SSISDB database will tell you when the IR is active.

In the SQL Account tab you can select the existing connection to the SSISDB. Then go to the Stored Procedure tab and add 'sp_executesql' as Stored procedure name. Next add a string parameter called stmt (statement) and paste the code below as value.

When finished connect the Resume-SSIS activity to this new Wait activity and then connect the Wait activity to the activity that executes the package.
-- Wait until Azure-SSIS IR is started
WHILE NOT EXISTS (SELECT * FROM [SSISDB].[catalog].[worker_agents] WHERE IsEnabled = 1 AND LastOnlineTime > DATEADD(MINUTE, -1, SYSDATETIMEOFFSET()))
BEGIN
    WAITFOR DELAY '00:00:30';
END
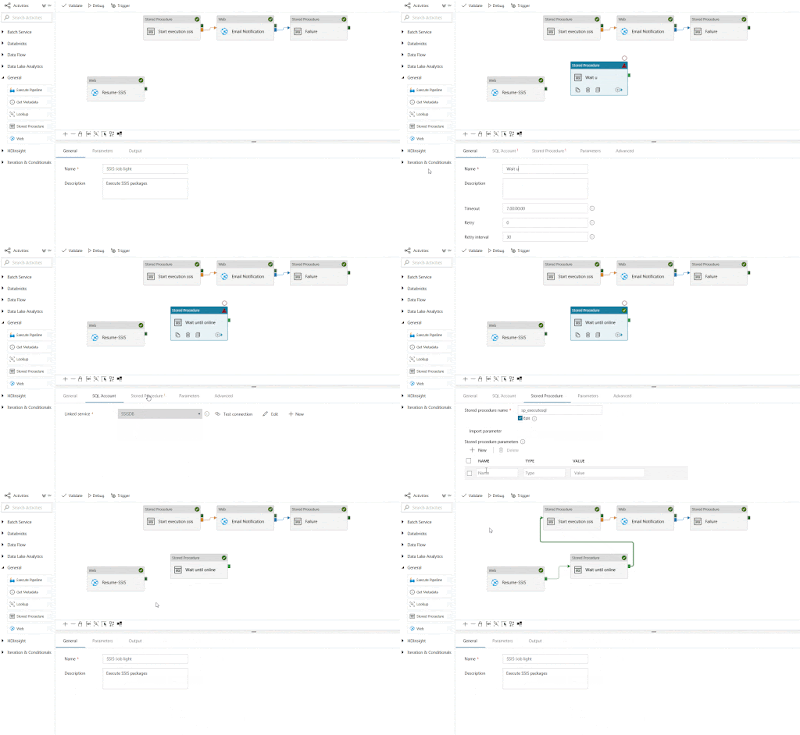
Add wait


Tip: add a 30 minute time-out on this activity to prevent endless waiting in case of unexpected errors.

4) Pause IR Web Activity
Last step is to add an other Web activity called Pause-SSIS. This is similar to the Resume-SSIS activity, but with an other Webhook URL. When finished connect the activity that executes the package to this new Pause activity. Make sure to change it from the default Success to Completion. Otherwise the IR keeps on running in case a package fails.

The only thing left is some realignment and then you can publish and test your ADF pipeline.
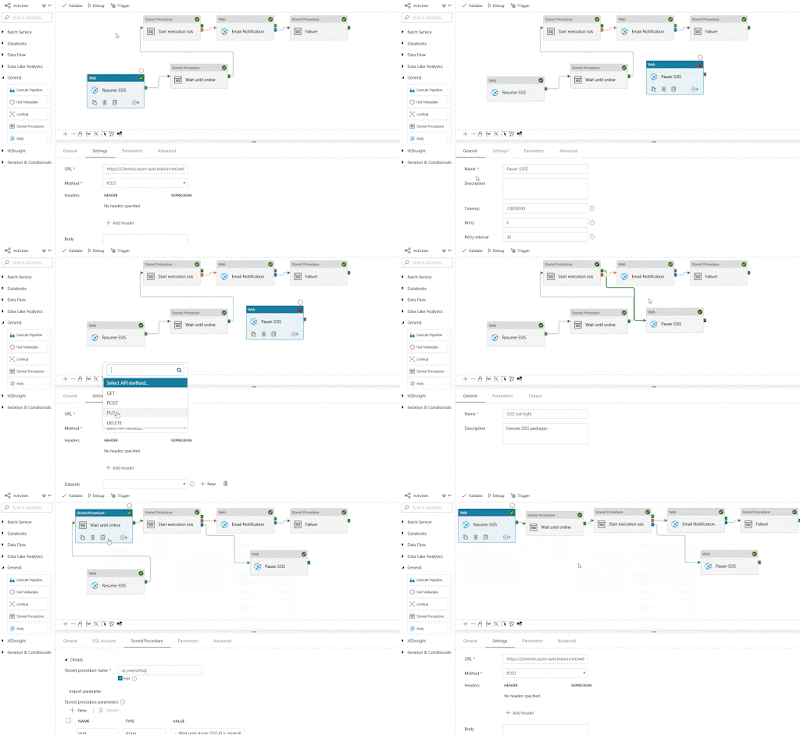
Add Web Activity for Pausing IR


5) Test result
If you run the pipeline and check its activities in the monitor you see all the individual steps. Starting the IR took almost 25 minutes of the 32 minutes in total. So now you only have to pay for the 32 minutes.
Activities


Summary
In this post I showed you how to pause and resume the Integration Runtime in the ADF pipeline. This is especially useful if you only have one job or just a few that don't run at the same time. For all other cases I recommend to schedule pause and resume.

Thursday 8 March 2018

Show SSIS error messages in the ADF monitor

Case
I want to see SSIS error messages in the ADF monitor or in the ADF email notification so that I can have a quick look to determine the severity of the problem without logging in with SSMS to the catalog in Azure. Is that possible?
Need more details in case of an error


Solution
It is possible but it requires to adjust the T-SQL statement that executes the package. Please follow all steps in this blog post, but replace the T-SQL code from step 4 with the code below.

The change is in the last part only. Previously it only showed that the execution failed, but now it also retrieves error messages from the catalog. Because the space is a bit limited we only show 7 errors. Errors with 'validation' in the text are less useful for the quick look we want. So those are filtered out as well. All messages are separated with a linefeed for a better overview.

-- Variables for execution and error message
declare @err_msg as varchar(8000) 
declare @err_msg_part as varchar(1000) 
declare @execution_id as bigint

-- Create execution and fill @execution_id variable
EXEC [SSISDB].[catalog].[create_execution] @package_name=N'Package.dtsx', @execution_id=@execution_id OUTPUT, @folder_name=N'SSISJoost', @project_name=N'MyAzureProject', @use32bitruntime=False, @reference_id=2, @useanyworker=True, @runinscaleout=True
 
-- Set logging level: 0=None, 1=Basic, 2=Performance, 3=Verbose 
EXEC [SSISDB].[catalog].[set_execution_parameter_value] @execution_id,  @object_type=50, @parameter_name=N'LOGGING_LEVEL', @parameter_value=1 
 
-- Set synchonized option 0=A-SYNCHRONIZED, 1=SYNCHRONIZED 
-- A-SYNCHRONIZED: don't wait for the result
EXEC [SSISDB].[catalog].[set_execution_parameter_value] @execution_id,  @object_type=50, @parameter_name=N'SYNCHRONIZED',  @parameter_value=1 
 
-- Execute the package with parameters from above
EXEC [SSISDB].[catalog].[start_execution] @execution_id, @retry_count=0

-- Check if the package executed successfully (only for SYNCHRONIZED execution)
IF (SELECT [status] FROM [SSISDB].[catalog].[executions] WHERE execution_id=@execution_id) <> 7
BEGIN
    SET @err_msg = 'Your package execution did not succeed for execution ID: ' + CAST(@execution_id AS NVARCHAR(20)) + CHAR(13) + CHAR(10)
    DECLARE err_cursor CURSOR FOR 
    SELECT  top(7) CAST([message] as varchar(1000)) as message -- Max 7 errors
    FROM  [catalog].[event_messages]
    WHERE  [event_name] = 'OnError' -- Only show errors
    AND   [operation_id] = @execution_id
    AND   [message]  not like '%validation%'
    -- Exclude less usefull validation messages like:    
    -- Error: One or more component failed validation.
    -- Error: There were errors during task validation.
    -- Error: Error 0xC0012050 while executing package from project reference package "xxx". Package failed validation from the ExecutePackage task. The package cannot run.
    -- Error: xxx failed validation and returned error code 0xC020801C.
    -- Error: "xxx" failed validation and returned validation status "VS_ISBROKEN".

    OPEN err_cursor  
    FETCH NEXT FROM err_cursor INTO @err_msg_part  
    WHILE @@FETCH_STATUS = 0  
    BEGIN
        SET @err_msg = @err_msg + @err_msg_part + CHAR(13) + CHAR(10) 
        FETCH NEXT FROM err_cursor INTO @err_msg_part 
    END 
    CLOSE err_cursor  
    DEALLOCATE err_cursor 

    RAISERROR(@err_msg,15,1)
END

Now it shows more details in the ADF monitor and if you are also using the ADF email notifications then the same messages will appear in the email. Feel free to suggest improvements in the comments.
More error details


Note that it is not a complete overview of all messages, but in most cases it should be enough for the seasoned developer to quickly identify the problem and take actions to solve it.


*update 13-04-2018: There is a new Execute SSIS Package activity, but without error options.*

Thursday 1 March 2018

Azure Blob Source ≠ Flat File Source

Case
I'm running my SSIS packages in Azure and my source is a flat file in an Azure Blob Storage container. Therefor I use the Azure Blob Source as a source in my Data Flow Task. However this source has just a few formatting options compared to the Flat File Source (and its connection manager). I want to specify things like qualifiers and data types. How do I do that?
Azure Blob Source has too few options


Solution
With the current version of the Azure Blob Source you can only specify the column separator, but there is a workaround available. Your Integration Runtime (IR) that is hosted in ADF is actually a virtual machine with Integration Services on it. A simple Script Task running on that IR reveals the drives and their available space. It shows that we have several drives available on that Virtual Machine.
Log with drive details


// C# Code to replace your Main() method
public void Main()
{
    // Create array with drive information
    System.IO.DriveInfo[] allDrives = System.IO.DriveInfo.GetDrives();

    // Create string to store a message
    String DriveDetails = "";

    // Loop through all drives to get info about it
    foreach (System.IO.DriveInfo d in allDrives)
    {
        // Get drive letter (C:) and type (NTFS)
        DriveDetails = d.Name + "(" + d.DriveType + ")" + Environment.NewLine;

        // If drive is ready you can get more details
        if (d.IsReady == true)
        {
            DriveDetails += " - Volume label: " + d.VolumeLabel + Environment.NewLine;
            DriveDetails += " - File system: " + d.DriveFormat + Environment.NewLine;
            DriveDetails += " - Available space to current user: " + d.AvailableFreeSpace + Environment.NewLine;
            DriveDetails += " - Total available space: " + d.TotalFreeSpace + Environment.NewLine;
            DriveDetails += " - Total size of drive: " + d.TotalSize;
        }

        // Fire the message as warning to stand out between other messages
        Dts.Events.FireWarning(0, "Details", DriveDetails, "", 0);
    }

    // End Script Task
    Dts.TaskResult = (int)ScriptResults.Success;
}

So the solution is to first use the Azure Blob Download Task to download the file from the Blob Storage Container to the Virtual Machine. After that you can use a regular Flat File Source in the Data Flow Task.
Azure Blob Download Task


I'm not sure what the purpose is of these disks and if one of them is for non-persistent data (disk that are automatically cleaned), but I recommend using the E drive to temporarily store the downloaded files and clean up afterwards.

Windows Temp folder
An alternative to pick a temporarily folder on your IR machine is to use a very simple Script Task with only one line of code that retrieves the path of the Windows temp folder. The path looks something like D:\Users\WATASK_1\AppData\Local\Temp\. If you store this path in an SSIS string variable, then you can use that for expressions on your tasks and Flat File connection manager. After the next reboot Windows removes all old files in this folder.
// C# code (see line 5)
public void Main()
{
    // TODO: Add your code here
    Dts.Variables["User::tempPath"].Value = System.IO.Path.GetTempPath();

    Dts.TaskResult = (int)ScriptResults.Success;
}

Script Task that fills a variable


Thursday 15 February 2018

Pause and resume Integration Runtime to save money

Case
Azure Data Factory (V2) now supports running SSIS packages in an Integration Runtime, but you are charged by the hour. How can I automatically pause (and resume) my SSIS environment in Azure to save some money on my Azure bill?
Pause your Integration Runtime in the portal


Solution
For this example I'm using an Integration Runtime (IR) that runs an SSIS package each hour during working hours. After working hour it is no longer necessary to refresh the data warehouse. Therefore the IR could be suspended to save money. I will also suspend the trigger that runs the pipeline (package) each hour to prevent errors. For this solution I will use a PowerShell script that runs in an Azure Automation Runbook.

1) Collect parameters
Before we start coding we first we need to get the name of the Azure Data Factory and its Resource group.
Your Azure Data Factory (V2)


If you also want to disable the trigger then we need its name. This is probably only necessary if you are running hourly and didn't create separate triggers for each hour. You can find it by clicking on Author & Monitor under Quick links.
Your trigger


2) Azure Automation Account
Create an Azure Automation Account. You can find it under + New, Monitoring + Management. Make sure that Create Azure Run As account is turned on.
Azure Automation Account


3) Import Module
We need to tell our code about Integration Runtimes in Azure Data Factory. You do this by adding a modules. Scroll down in the menu of the Automation Account and click on Module. Now you see all installed modules. We need to add the module called AzureRM.DataFactoryV2, however it depends on AzureRM.Profile (≥ 4.2.0). Click on Browse gallery and search for AzureRM.Profile and import it and then repeat it for AzureRM.DataFactoryV2. Make sure to add the V2 version!
Import modules


4) Connections
This step is for your information only and to understand the code. Under Connections you will find a default connection named 'AzureRunAsConnection' that contains information about the Azure environment, like the tendant id and the subscription id. To prevent hardcoded connection details we will retrieve some of these fields in the PowerShell code.
AzureRunAsConnection


5) Runbooks
Now it is time to add a new Azure Runbook for the PowerShell code. Click on Runbooks and then add a new runbook (There are also five example runbooks of which AzureAutomationTutorialScript could be useful as an example). Give your new Runbook a suitable name and choose PowerShell as type. There will be two separate runbooks/scripts: one for pause and one for resume. When finished with the Pause script you need to repeat this for the Resume script.
Create new Rubook


6) Edit Script
After clicking Create in the previous step the editor will we opened. When editing an existing Runbook you need to click on the Edit button to edit the code. You can copy and paste the code of one of these scripts below to your editor. Study the green comments to understand the code. Also make sure to fill in the right value for the variables (see parameters).

The first script is the pause script and the second script is the resume script. You could merge both scripts and use an if statement on the status property to either pause or resume, but I prefer two separate scripts both with their own schedule.

# This scripts pauses your Integration Runtime (and its trigger) if it is running

# Parameters
$ConnectionName = 'AzureRunAsConnection'
$DataFactoryName = 'ADF-SSISJoost'
$ResourceGroup = 'joost_van_rossum'
$TriggerName = 'Hourly'

# Do not continue after an error
$ErrorActionPreference = "Stop"

########################################################
# Log in to Azure (standard code)
########################################################
Write-Verbose -Message 'Connecting to Azure'
try
{
    # Get the connection "AzureRunAsConnection "
    $ServicePrincipalConnection = Get-AutomationConnection -Name $ConnectionName         

    'Log in to Azure...'
    $null = Add-AzureRmAccount `
        -ServicePrincipal `
        -TenantId $ServicePrincipalConnection.TenantId `
        -ApplicationId $ServicePrincipalConnection.ApplicationId `
        -CertificateThumbprint $ServicePrincipalConnection.CertificateThumbprint 
}
catch 
{
    if (!$ServicePrincipalConnection)
    {
        # You forgot to turn on 'Create Azure Run As account' 
        $ErrorMessage = "Connection $ConnectionName not found."
        throw $ErrorMessage
    }
    else
    {
        # Something went wrong
        Write-Error -Message $_.Exception.Message
        throw $_.Exception
    }
}
########################################################


# Get Integration Runtime in Azure Data Factory
$IntegrationRuntime = Get-AzureRmDataFactoryV2IntegrationRuntime `
                            -DataFactoryName $DataFactoryName `
                            -ResourceGroupName $ResourceGroup

# Check if Integration Runtime was found
if (!$IntegrationRuntime)
{
    # Your ADF does not have a Integration Runtime
    # or the ADF does not exist
    $ErrorMessage = "No Integration Runtime found in ADF $($DataFactoryName)."
    throw $ErrorMessage
}
# Check if the Integration Runtime is running
elseif ($IntegrationRuntime.State -eq "Started")
{
    <# Start Trigger Deactivation #>
    # Getting trigger to check if it exists
    $Trigger = Get-AzureRmDataFactoryV2Trigger `
  -DataFactoryName $DataFactoryName `
  -Name $TriggerName `
  -ResourceGroupName $ResourceGroup

    # Check if the trigger was found
    if (!$Trigger)
    {
        # Fail options:
        # The ADF does not exist (typo)
        # The trigger does not exist (typo)
        $ErrorMessage = "Trigger $($TriggerName) not found."
        throw $ErrorMessage
    }
    # Check if the trigger is activated
    elseif ($Trigger.RuntimeState -eq "Started")
    {
        Write-Output "Stopping Trigger $($TriggerName)"
        $null = Stop-AzureRmDataFactoryV2Trigger `
                    -DataFactoryName $DataFactoryName `
                    -Name $TriggerName `
                    -ResourceGroupName $ResourceGroup `
                    -Force
    }
    else
    {
        # Write message to screen (not throwing error)
        Write-Output "Trigger $($TriggerName) is not activated."
    }
    <# End Trigger Deactivation #>

    # Stop the integration runtime
    Write-Output "Pausing Integration Runtime $($IntegrationRuntime.Name)."
    $null = Stop-AzureRmDataFactoryV2IntegrationRuntime `
                -DataFactoryName $IntegrationRuntime.DataFactoryName `
                -Name $IntegrationRuntime.Name `
                -ResourceGroupName $IntegrationRuntime.ResourceGroupName `
                -Force
    Write-Output "Done"
}
else
{
    # Write message to screen (not throwing error)
    Write-Output "Integration Runtime $($IntegrationRuntime.Name) is not running."
}


# This scripts resumes your Integration Runtime (and its trigger) if it is stopped

# Parameters
$ConnectionName = 'AzureRunAsConnection'
$DataFactoryName = 'ADF-SSISJoost'
$ResourceGroup = 'joost_van_rossum'
$TriggerName = 'Hourly'

# Do not continue after an error
$ErrorActionPreference = "Stop"

########################################################
# Log in to Azure (standard code)
########################################################
Write-Verbose -Message 'Connecting to Azure'
try
{
    # Get the connection "AzureRunAsConnection "
    $ServicePrincipalConnection = Get-AutomationConnection -Name $ConnectionName         

    'Log in to Azure...'
    $null = Add-AzureRmAccount `
        -ServicePrincipal `
        -TenantId $ServicePrincipalConnection.TenantId `
        -ApplicationId $ServicePrincipalConnection.ApplicationId `
        -CertificateThumbprint $ServicePrincipalConnection.CertificateThumbprint 
}
catch 
{
    if (!$ServicePrincipalConnection)
    {
        # You forgot to turn on 'Create Azure Run As account' 
        $ErrorMessage = "Connection $ConnectionName not found."
        throw $ErrorMessage
    }
    else
    {
        # Something went wrong
        Write-Error -Message $_.Exception.Message
        throw $_.Exception
    }
}
########################################################


# Get Integration Runtime in Azure Data Factory
$IntegrationRuntime = Get-AzureRmDataFactoryV2IntegrationRuntime `
                            -DataFactoryName $DataFactoryName `
                            -ResourceGroupName $ResourceGroup

# Check if Integration Runtime was found
if (!$IntegrationRuntime)
{
    # Your ADF does not have a Integration Runtime
    # or the ADF does not exist
    $ErrorMessage = "No Integration Runtime found in ADF $($DataFactoryName)."
    throw $ErrorMessage
}
# Check if the Integration Runtime is running
elseif ($IntegrationRuntime.State -ne "Started")
{
    # Resume the integration runtime
    Write-Output "Resuming Integration Runtime $($IntegrationRuntime.Name)."
    $null = Start-AzureRmDataFactoryV2IntegrationRuntime `
                -DataFactoryName $IntegrationRuntime.DataFactoryName `
                -Name $IntegrationRuntime.Name `
                -ResourceGroupName $IntegrationRuntime.ResourceGroupName `
                -Force
    Write-Output "Done"
}
else
{
    # Write message to screen (not throwing error)
    Write-Output "Integration Runtime $($IntegrationRuntime.Name) is already running."
}

<# Start Trigger Activation #>
# Getting trigger to check if it exists
$Trigger = Get-AzureRmDataFactoryV2Trigger `
    -DataFactoryName $DataFactoryName `
    -Name $TriggerName `
    -ResourceGroupName $ResourceGroup

# Check if the trigger was found
if (!$Trigger)
{
    # Fail options:
    # The ADF does not exist (typo)
    # The trigger does not exist (typo)
    $ErrorMessage = "Trigger $($TriggerName) not found."
    throw $ErrorMessage
}
# Check if the trigger is activated
elseif ($Trigger.RuntimeState -ne "Started")
{
    Write-Output "Resuming Trigger $($TriggerName)"
    $null = Start-AzureRmDataFactoryV2Trigger `
                -DataFactoryName $DataFactoryName `
                -Name $TriggerName `
                -ResourceGroupName $ResourceGroup `
                -Force
}
else
{
    # Write message to screen (not throwing error)
    Write-Output "Trigger $($TriggerName) is already activated."
}
<# End Trigger Deactivation #>

Note: when you don't want to disable your trigger then remove the lines between <# Start Trigger Deactivation #> and <# End Trigger Deactivation #>.

7) Testing
You can use the Test Pane menu option in the editor to test your PowerShell scripts. When clicking on Run it will first Queue the script before Starting it. Running takes a couple of minutes.
Pausing Integration Runtime


Resuming Integration Runtime (20 minutes+)


8) Publish
When your script is ready, it is time to publish it. Above the editor click on the Publish button. Confirm overriding any previously published versions.
Publish your script


9) Schedule
And now that we have a working and published Azure Runbook, we need to schedule it. Click on Schedule to create a new schedule for your runbook. My packages run each hour during working hours. So for the resume script I created a schedule that runs every working day on 7:00AM. The pause script could for example be scheduled on working days at 9:00PM (21:00).
Now you need to hit the refresh button in the Azure Data Factory dashboard to see if it really works. It takes a few minutes to run, so don't worry too soon.
Add schedule


Summary
In this post you saw how you can pause and resume your Integration Runtime in ADF to save some money on your Azure bill during the quiet hours. As said before pausing and resuming the trigger is optional. When creating the schedule, keep in mind that resuming/starting takes around 20 minutes to finish and note that you also pay during this startup phase.
Steps 5 to 9 need to be repeated for the resume script after you finished the pause script.

Update: you can also do a pause and resume in the pipeline itself if you only have one ETL job.

Update 2: now even easier done via Rest API

Saturday 10 February 2018

SSIS Snack: The semaphore timeout period has expired

Case
My SSIS package that runs in Azure Data Factory V2 (and gets data from an on-premises source) suddenly stops working and throws an communication error. After this error it won't run again. What is happening?

TCP Provider: The semaphore timeout period has expired


DFT - DIM_xxxxx:Error: SSIS Error Code DTS_E_OLEDBERROR.  An OLE DB error has occurred. Error code: 0x80004005.
An OLE DB record is available.  Source: "Microsoft SQL Server Native Client 11.0"  Hresult: 0x80004005  Description: "Communication link failure".
An OLE DB record is available.  Source: "Microsoft SQL Server Native Client 11.0"  Hresult: 0x80004005  Description: "TCP Provider: The semaphore timeout period has expired.".


Solution
The error seems to be caused by a network communication hiccup with our on-premises source which is connected with a VNET in Azure. Although I do not know the actual cause of the error. There is a solution: restart your Integration Runtime.

1) ADF dashboard
Go to your Azure Data Factory (ADF) that hosts your Integration Runtime and click on Author & Monitor within the Quick links section. This will open the ADF dashboard.
Author & Monitor


2) Stop & Start IR
Click on Author (pencil), on Connections and then on Integration Runtimes (IR). Then Stop and start your IR. This could take up to 30 minutes! After that rerun your package and it should be working again.
Stop & Start IR


Please let me know in the comments whether it worked for you and if you found the actual cause of the error.

Sunday 4 February 2018

Schedule package in Azure Integration Services (ADF V2)

Case
I have deployed my SSIS project to an SSIS Catalog in Azure (Data Factory) and now I want to schedule the package to run each day at 7:00AM. How do I do that?
How to schedule this SSIS package in Azure?


Solution
Microsoft suggests the following options:
  • SQL Server Agent. Here you use an on-premises SQL Server Agent to schedule the SSIS package in the cloud. This sounds like the least attractive solution. However if you still have a lot of on-premises projects that all run via SQL Server Agent then it is easy to use this solution and have all scheduled executions on one location.
  • SQL Database elastic jobs. This requires adding an extra component to your subscription, but if you already use a SQL Elastic database pool then this could be a good solution. Will try this in a future post.
  • Azure Data Factory. Since we already use ADF V2 to host the Integration Runtime, this is most obvious solution. It executes a stored procedure that executes the package.
This post explains the ADF solution with the stored procedure, but executing an stored procedure can be done in various other Azure components such as a Runbook in Azure Automation, Logic Apps or even Azure Functions with a trigger on arriving new files in a Blob Storage container.

*update 13-04-2018: new Execute SSIS Package activity*

1) ADF V2 - Author & Monitor
Go to your Azure Data Factory that hosts your SSIS Integration Runtime. Under Quick links, click on the Author & Monitor link. A new tab will be opened with the Azure Data Factory dashboard. Next click on Create Pipeline circle and go to the next step.
Azure Data Factory dashboard


2) Create pipeline with Stored Procedure
You just created a new pipeline in the previous step. Give it a descriptive name (like 'SSIS Job MyAzureProject') in the General tab. A description is optional. Next collapse the General activities and drag a Stored Procedure to the canvas. Again, give it a descriptive name in the General tab.
Add Stored Procedure to Pipeline


3) Linked service
Next step is to create a linked service to the SSISDB to execute the Stored Procedure. Go to the SQL Account tab and add a new Linked service. Point it to the SSISDB that hosts the package that you want to execute. Hit the test button after filling in all fields to make sure the everything is correct. Then click Finish and continue to the next step.
Most important fields of the Linked service


Add Linked service


4) Creating Stored Procedure call
The code to execute a package consists of multiple Stored Procedures. To keep it simple we will use sp_executesql to execute a string of SQL code containing all Stored Procedure calls. You can easily create the SQL for this in SSMS.

Go to your package in the Catalog. Right click it and choose Execute... Now set all options like Logging Level, Environment and 32/64bit. After setting all options hit the Script button instead of the Ok button. This is the code you want to use. You can finetune it with some code to check whether the package finished successfully.
Generating code in SSMS


The code below was generated and finetuned. Copy your code we need it in the next step.
-- Variables for execution and error message
DECLARE @execution_id bigint, @err_msg NVARCHAR(150)

-- Create execution and fill @execution_id variable
EXEC [SSISDB].[catalog].[create_execution] @package_name=N'Package.dtsx', @execution_id=@execution_id OUTPUT, @folder_name=N'SSISJoost', @project_name=N'MyAzureProject', @use32bitruntime=False, @reference_id=Null, @useanyworker=True, @runinscaleout=True

-- Set logging level: 0=None, 1=Basic, 2=Performance, 3=Verbose 
EXEC [SSISDB].[catalog].[set_execution_parameter_value] @execution_id,  @object_type=50, @parameter_name=N'LOGGING_LEVEL', @parameter_value=1 

-- Set synchonized option 0=A-SYNCHRONIZED, 1=SYNCHRONIZED 
-- A-SYNCHRONIZED: don't wait for the result
EXEC [SSISDB].[catalog].[set_execution_parameter_value] @execution_id,  @object_type=50, @parameter_name=N'SYNCHRONIZED',  @parameter_value=1 

-- Execute the package with parameters from above
EXEC [SSISDB].[catalog].[start_execution] @execution_id, @retry_count=0

-- Check if the package executed succesfully (only for SYNCHRONIZED execution)
IF(SELECT [status] FROM [SSISDB].[catalog].[executions] WHERE execution_id=@execution_id)<>7
BEGIN
 SET @err_msg=N'Your package execution did not succeed for execution ID: ' + CAST(@execution_id AS NVARCHAR(20))
 RAISERROR(@err_msg,15,1)
END

The last part of this T-SQL code is very useful. It will cause an error in de pipeline monitor of ADF when a package fails. When you click on the text balloon it will show which SSIS execution failed.
Showing when a package fails in the Pipeline monitor


5) Adding Stored Procedure
Go to the Stored Procedure tab and enter a Stored Procedure name manually by first checking the Edit option. Then enter sp_executesql. Then add a new parameter with the name stmt (type string) and paste the complete code of the previous step the value field. After this we are ready to test and schedule this ADF Pipeline.
Add Stored Procedure code


6) Publish and trigger
Now it is time to test the Pipeline, but first hit the Publish All button (on the left side) to publish your new pipeline to ADF. Then click on the Trigger button and choose Trigger Now to execute the pipeline immediately.

After that click on the Monitor button to check your execution and/or go to the Catalog and open an execution report to see the result.
Publish and trigger manually


7) Schedule
If everything went well it is time to schedule your package. Go back to the Author page by clicking on the pencil (on the left side). Then click on the Trigger button, but now choose New/Edit to create a new schedule for your pipeline (package). For this example I choose Daily at 7:00AM. After adding the new schedule you have to Publish your pipeline (again).
Add Schedule


Note: that it uses UTC time.


Related Posts Plugin for WordPress, Blogger...