Case
You showed me how to schedule a
pause and resume of the Integration Runtime (IR) in Azure Automation, but can you also start and stop IR in the Azure Data Factory (ADF) pipeline with one of the activities? This will save the most money possible, especially when you only have one ETL job.
 |
| Pause and Resume IR in ADF pipeline |
Solution
Yes you can and even better... you can reuse the existing Runbook PowerShell script that
pauses and resumes the IR. Instead of scheduling it, which is more appropriate when you have multiple projects to run, we will call the scripts via their webhooks.
Update: now easier done via Rest API
Prerequisites
A) Azure Automation Runbook
If you already have the two
Runbooks that pauses and resumes the IR then you could skip step 1 to 8 and only do step 9 (create webhook) for both scripts. But then make sure to delete, disable or unlink the schedule of the two Runbooks and remove the optional trigger part of the code.
1) Collect parameters
Before we start coding we first we need to get the name of the Azure Data Factory and its Resource group.
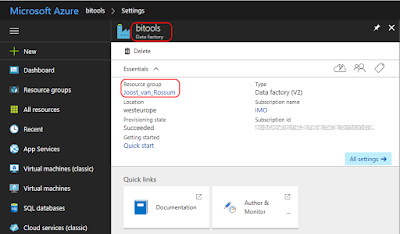 |
| Your Azure Data Factory (V2) |
2) Azure Automation Account
Create an Azure Automation Account. You can find it under + New,
Monitoring + Management. Make sure that Create Azure Run As account is turned on.
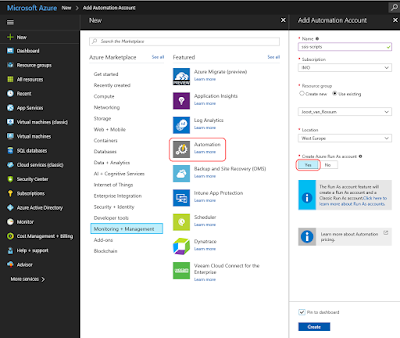 |
| Azure Automation Account |
3) Import Module
We need to tell our code about Integration Runtimes in Azure Data Factory. You do this by adding a modules. Scroll down in the menu of the Automation Account and click on Module. Now you see all installed modules. We need to add the module called
AzureRM.DataFactoryV2, however it depends on
AzureRM.Profile (≥ 4.2.0). Click on Browse gallery and search for
AzureRM.Profile and import it and then repeat it for
AzureRM.DataFactoryV2. Make sure to add the V2 version!
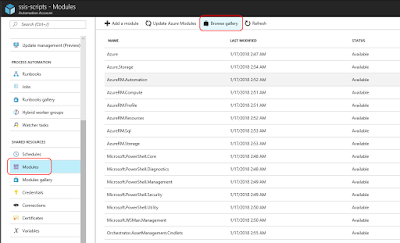 |
| Import modules |
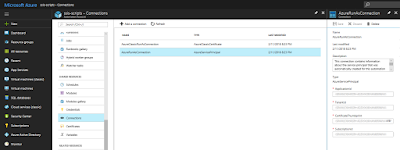
4) Connections
This step is for your information only and to understand the code. Under Connections you will find a default connection named 'AzureRunAsConnection' that contains information about the Azure environment, like the tendant id and the subscription id. To prevent hardcoded connection details we will retrieve some of these fields in the PowerShell code.
 |
| AzureRunAsConnection |
Now it is time to add a new Azure Runbook for the PowerShell code. Click on Runbooks and then add a new runbook (There are also five example runbooks of which AzureAutomationTutorialScript could be useful as an example). Give your new Runbook a suitable name and choose PowerShell as type. There will be two separate runbooks/scripts: one for pause and one for resume. When finished with the Pause script you need to repeat this for the Resume script (steps 5 to 9).
 |
| Create new Rubook |
6) Edit Script
After clicking Create in the previous step the editor will we opened. When editing an existing Runbook you need to click on the Edit button to edit the code. You can copy and paste the code of one of these scripts below to your editor. Study the green comments to understand the code. Also make sure to fill in the right value for the variables (see parameters).
The first script is the pause script and the second script is the resume script. You could merge both scripts and use an if statement on the status property or
some parameters to either pause or resume, but I prefer two separate scripts.
# This scripts pauses your Integration Runtime if it is running

# Parameters
$ConnectionName = 'AzureRunAsConnection'
$DataFactoryName = 'ADF-SSISJoost'
$ResourceGroup = 'joost_van_rossum'

# Do not continue after an error
$ErrorActionPreference = "Stop"

########################################################
# Log in to Azure (standard code)
########################################################
Write-Verbose -Message 'Connecting to Azure'
try
{
    # Get the connection "AzureRunAsConnection "
    $ServicePrincipalConnection = Get-AutomationConnection -Name $ConnectionName

    'Log in to Azure...'
    $null = Add-AzureRmAccount `
        -ServicePrincipal `
        -TenantId $ServicePrincipalConnection.TenantId `
        -ApplicationId $ServicePrincipalConnection.ApplicationId `
        -CertificateThumbprint $ServicePrincipalConnection.CertificateThumbprint
}
catch
{
    if (!$ServicePrincipalConnection)
    {
        # You forgot to turn on 'Create Azure Run As account'
        $ErrorMessage = "Connection $ConnectionName not found."
        throw $ErrorMessage
    }
    else
    {
        # Something went wrong
        Write-Error -Message $_.Exception.Message
        throw $_.Exception
    }
}
########################################################


# Get Integration Runtime in Azure Data Factory
$IntegrationRuntime = Get-AzureRmDataFactoryV2IntegrationRuntime `
                            -DataFactoryName $DataFactoryName `
                            -ResourceGroupName $ResourceGroup

# Check if Integration Runtime was found
if (!$IntegrationRuntime)
{
    # Your ADF does not have a Integration Runtime
    # or the ADF does not exist
    $ErrorMessage = "No Integration Runtime found in ADF $($DataFactoryName)."
    throw $ErrorMessage
}
# Check if the Integration Runtime is running
elseif ($IntegrationRuntime.State -eq "Started")
{
    # Stop the integration runtime
    Write-Output "Pausing Integration Runtime $($IntegrationRuntime.Name)."
    $null = Stop-AzureRmDataFactoryV2IntegrationRuntime `
                -DataFactoryName $IntegrationRuntime.DataFactoryName `
                -Name $IntegrationRuntime.Name `
                -ResourceGroupName $IntegrationRuntime.ResourceGroupName `
                -Force
    Write-Output "Done"
}
else
{
    # Write message to screen (not throwing error)
    Write-Output "Integration Runtime $($IntegrationRuntime.Name) is not running."
}
# This scripts resumes your Integration Runtime if it is stopped

# Parameters
$ConnectionName = 'AzureRunAsConnection'
$DataFactoryName = 'ADF-SSISJoost'
$ResourceGroup = 'joost_van_rossum'

# Do not continue after an error
$ErrorActionPreference = "Stop"

########################################################
# Log in to Azure (standard code)
########################################################
Write-Verbose -Message 'Connecting to Azure'
try
{
    # Get the connection "AzureRunAsConnection "
    $ServicePrincipalConnection = Get-AutomationConnection -Name $ConnectionName

    'Log in to Azure...'
    $null = Add-AzureRmAccount `
        -ServicePrincipal `
        -TenantId $ServicePrincipalConnection.TenantId `
        -ApplicationId $ServicePrincipalConnection.ApplicationId `
        -CertificateThumbprint $ServicePrincipalConnection.CertificateThumbprint
}
catch
{
    if (!$ServicePrincipalConnection)
    {
        # You forgot to turn on 'Create Azure Run As account'
        $ErrorMessage = "Connection $ConnectionName not found."
        throw $ErrorMessage
    }
    else
    {
        # Something went wrong
        Write-Error -Message $_.Exception.Message
        throw $_.Exception
    }
}
########################################################


# Get Integration Runtime in Azure Data Factory
$IntegrationRuntime = Get-AzureRmDataFactoryV2IntegrationRuntime `
                            -DataFactoryName $DataFactoryName `
                            -ResourceGroupName $ResourceGroup

# Check if Integration Runtime was found
if (!$IntegrationRuntime)
{
    # Your ADF does not have a Integration Runtime
    # or the ADF does not exist
    $ErrorMessage = "No Integration Runtime found in ADF $($DataFactoryName)."
    throw $ErrorMessage
}
# Check if the Integration Runtime is running
elseif ($IntegrationRuntime.State -ne "Started")
{
    # Resume the integration runtime
    Write-Output "Resuming Integration Runtime $($IntegrationRuntime.Name)."
    $null = Start-AzureRmDataFactoryV2IntegrationRuntime `
                -DataFactoryName $IntegrationRuntime.DataFactoryName `
                -Name $IntegrationRuntime.Name `
                -ResourceGroupName $IntegrationRuntime.ResourceGroupName `
                -Force
    Write-Output "Done"
}
else
{
    # Write message to screen (not throwing error)
    Write-Output "Integration Runtime $($IntegrationRuntime.Name) is already running."
}
7) Testing
You can use the Test Pane menu option in the editor to test your PowerShell scripts. When clicking on Run it will first Queue the script before Starting it. Running takes a couple of minutes.
 |
| Pausing Integration Runtime |
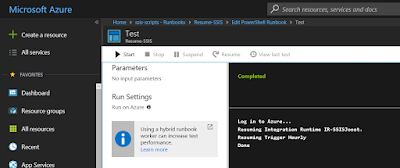 |
| Resuming Integration Runtime (20 minutes+) |
When your script is ready, it is time to publish it. Above the editor click on the Publish button. Confirm overriding any previously published versions.
 |
| Publish your script |
9) Adding a Webhook
To start the runbooks we will be using a Webhook. This is a URL with a long key in it.
Do not share this URL, because with it others could execute your runbook. Treat it like a password.
On the Runbook overview page click on
Webhook and create a new Webhook. Give it a suitable name (that is similar to its runbook). Set the expiration date and don't forget the copy the URL. This is the only time you can see the URL. If you loose it you need to recreate the Webhook. The URL looks something like:
https://s2events.azure-automation.net/webhooks?token=vfIx%2fOAHcsJCn95abSXbklPrPXNlFUHwpr%2bSWyANlk0%3d
 |
| Add Webhook |
B) Azure Data Factory
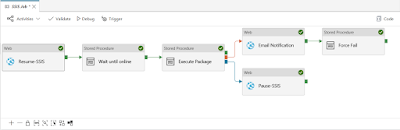
The scripts are now ready. Next go to your existing ADF pipeline that executes the SSIS package. We will be adding two activities before executing the package and one behind it.
1) Resume IR Add Web Activity
Next collapse the General activities and drag a Web activity as first activity in your pipeline. This activity will be calling the Webhook of the Resume-SSIS runbook. Give it a suitable name like 'Resume-SSIS'.
 |
| Add Web Activity for Resume IR |
2) Resume IR Web activity settings
Select the newly added Web activity and go to the Settings page. In the URL field you must paste the URL from step A9 (the URL/Webhook that resumes the IR) and as method you need to select
Post.
 |
| Add Webhook URL |
3) Wait until online Stored Procedure
Because calling the Webhook is asynchronous (don't wait for the result) and starting the IR takes 15 to 20 minutes we need to wait that amount of time. The database view [catalog].[worker_agents] in the SSISDB database will tell you when the IR is active.
In the SQL Account tab you can select the existing connection to the SSISDB. Then go to the Stored Procedure tab and add 'sp_executesql' as Stored procedure name. Next add a string parameter called stmt (statement) and paste the code below as value.
When finished connect the Resume-SSIS activity to this new Wait activity and then connect the Wait activity to the activity that executes the package.
-- Wait until Azure-SSIS IR is started
WHILE NOT EXISTS (SELECT * FROM [SSISDB].[catalog].[worker_agents] WHERE IsEnabled = 1 AND LastOnlineTime > DATEADD(MINUTE, -1, SYSDATETIMEOFFSET()))
BEGIN
    WAITFOR DELAY '00:00:30';
END
 |
| Add wait |
Tip: add a 30 minute time-out on this activity to prevent endless waiting in case of unexpected errors.
4) Pause IR Web Activity
Last step is to add an other Web activity called Pause-SSIS. This is similar to the Resume-SSIS activity, but with an other Webhook URL. When finished connect the activity that executes the package to this new Pause activity. Make sure to change it from the default Success to Completion. Otherwise the IR keeps on running in case a package fails.
The only thing left is some realignment and then you can publish and test your ADF pipeline.
 |
| Add Web Activity for Pausing IR |
5) Test result
If you run the pipeline and check its activities in the monitor you see all the individual steps. Starting the IR took almost 25 minutes of the 32 minutes in total. So now you only have to pay for the 32 minutes.
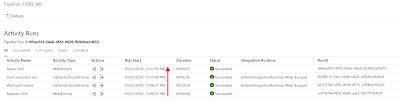 |
| Activities |
Summary
In this post I showed you how to pause and resume the Integration Runtime in the ADF pipeline. This is especially useful if you only have one job or just a few that don't run at the same time. For all other cases I recommend to schedule
pause and resume.


