Showing posts with label ADF. Show all posts

Saturday, 13 February 2021

Start and Stop SSIS Integration Runtimes with ADF only

Case
I want to stop and start my SSIS Integration Runtime from within my Azure Data Factory pipeline, but I don't want write any code or use other Azure services like Azure Automation or Azure Logic Apps to do this. Is there an Azure Data Factory-only solution where we only use the standard pipeline activities from ADF?
SSIS Integration Runtime


Solution
Yes there is a nocode solution where you use the Web Activity to call the Rest API of Integration Runtimes (as part of ADF), but oddly enough that requires you to give ADF permissions to its own Integration Runtime via its Managed Service Identity (MSI).


1) Give ADF access to ADF via MSI
For this example we will give ADF access to its own resources. Giving access is done via MSI (managed service identity). The minimum role needed is Data Factory Contributor, but you could also use a regular Contributor or Owner (but less is more).
  • Go to the Data Factory in the Azure Portal
  • In the left menu click on Access control (IAM)
  • Click on the +Add button and choose Add role assignment
  • Select Data Factory Contributor as Role
  • Use Data Factory as Assign access to
  • Changing the subscription is probably not necessary
  • Optionally enter a (partial) name of your parent ADF (if you have a lot of data factories)
  • Select your ADF and click on the Save button
Giving ADF access to its own resources


2) Add Web Activity
In your ADF pipeline you need to add a Web Activity to call the Rest API of the integration runtimes. First step is to determine the Rest API URL. Replace in the string below, the <xxx> values with the subscription id, resource group, data factory name and the name of the integration runtime. The Rest API method we will be using is 'Start' but you can replace that word by 'Stop' to pause the SSIS IR:
https://management.azure.com/subscriptions/<xxx>/resourceGroups/<xxx>/providers/Microsoft.DataFactory/factories/<xxx>/integrationRuntimes/<xxx>/start?api-version=2018-06-01

Example:
https://management.azure.com/subscriptions/a74a173e-4d8a-48d9-9ab7-a0b85abb98fb/resourceGroups/bitools/providers/Microsoft.DataFactory/factories/bitools/integrationRuntimes/bitoolsir/start?api-version=2018-06-01

Second step is to create a JSON message for the Rest API. Well the Rest API doesn't use it, but it is required in the Web activity when you use POST as method. So you just need to create a dummy json message:
{
    "Dummy": "Dummy"
}
  • Add the Web activity to your pipeline
  • Give it a descriptive name like Start SSIS (or Stop SSIS)
  • Go to the Settings tab
  • Use the Rest API URL from above in the URL property
  • Choose POST as Method
  • Add the dummy JSON message from above in the Body property
  • Under advanced choose MSI as Authentication method
  • Add 'https://management.azure.com/ in the Resource property
Web Activity calling the SSIS IR Rest API

Now run the pipeline by hitting the debug button in the pipeline editor and check the output.
Then Debug the Pipeline to check the stop/start action


3) Retrieve info
By changing the operation in the URL (stop or start) to 'getStatus', you can retrieve the current status of the integration runtime. With this information you could for example first check the status before changing it. The expression in the If condition could be something like:
@equals(activity('Get SSIS IR Status').output.properties.state,'Stopped')
Using 'getstatus' operation to retrieve current status


Status available in output


Conclusion
In this post you learned how easy it is to add a stop and start option in your pipeline to save some money on your Azure bill. Check out my other blog (https://microsoft-bitools.blogspot.com/) for more Rest API solutions in Azure Data Factory.

Wednesday, 12 June 2019

Azure DevOps - Build SSIS project (CI)

Case
I have my SSIS project in Git (Azure Repos Git) and I want to build my project in Azure DevOps. How do I add Continuous Integration (CI) for my SSIS project?
DevOps - Build pipeline


Solution
For this example we start with an SSIS project already in Azure Repos Git and build the project automatically when committing changes. Deployment (CD) of SSIS will be handled in a separate post.
Update Dec 6: New Microsoft SSIS Build task

1) New Build Pipeline
Go to Pipelines and then to Builds. In the list of pipelines you will find the + New sign. Click on it and choose New build pipeline. Now you can choose where your code is located. However on the bottom you will find the option "Use the classic editor to create a pipeline without YAML." For this example we will use this option since SSIS is a bit old school. As last step choose the Empty job and give your CI pipeline a useful name.
Creating new CI pipeline in DevOps for SSIS


2) NuGet Tool Installer
Since we will be needing an SSIS building tool that is available as NuGet, we first need to install NuGet itself. Click on the plus icon behind the "Agent job 1" (you need to give that a better name) and search for "NuGet" choose the NuGet Tool Installer and determine which version of NuGet you need. Fot this example I used 5.1.0 but click on the information icon behind version to get a list of of versions.
DevOps - NuGet Tool Installer


3) NuGet SSISBUILD
Now that we have installed the tool NuGet itself we can install a so called NuGet package. The one we will be needing is called SSISBuild. Add a Task to the agent and search for NuGet again. Choose NuGet and change the command to Custom. Then enter the follow command to install SSISBuild to the Build Server: install SSISBuild -Version 2.3.0
DevOps - NuGet install SSISBuild


4) PowerShell to build SSIS project
Now the most important step: the building of the SSIS project. We will be using PowerShell for this Task. Add a PowerShell Task to run PowerShell on Windows(, macOS, or Linux). Then change the script type to InLine and copy & paste the code below. On the first line of code (excl comments) you have to specify the path of your SSIS project starting from the solution folder untill the extension .dtproj. In the code a Predefined variable called Build.SourcesDirectory will be concatenated to this path to specify the project path on the server.
DevOps - PowerShel task to build the SSIS project


# PowerShell code
# The path of the project starting from the solution folder
$ProjectToBuild = "\SSIS\RM\StandardReportGenerator\StandardReportGenerator.dtproj"

# Join the path of the build server with the path of the project
$ProjectFilePath = Join-Path -Path $env:BUILD_SOURCESDIRECTORY -ChildPath $ProjectToBuild

# Check if the file exists on the build server
if (!(Test-Path $ProjectFilePath)) {
    # Not found, throw error
    throw "Project $($ProjectFilePath) not found!"
}
else
{
    # Call ssisbuild.exe with parameters to build this project
    &"$($env:BUILD_SOURCESDIRECTORY)\SSISBuild.2.3.0\tools\ssisbuild.exe" $ProjectFilePath -Configuration Development -ProtectionLevel DontSaveSensitive

    # Check whether the build was successful
    if ($LASTEXITCODE -ne 0) {
        # Build failed, throw error
        throw "Build of $($ProjectFilePath) failed.";
    }
}

You can also test this locally on your own computer. Then you have to download and unzip the SSISBuild nuget to your Visual Studio solution folder and add one line of code at the top to fill Predefined variable with the solution path on your local computer.
# PowerShell code
$env:BUILD_SOURCESDIRECTORY = "D:\sources\xxxxxxbi\"

Test locally with PowerShell ISE


The PowerShell is very basic at the moment (KISS), but there are some options to extend the possibilities for this PowerShell. These will be handled in a separate post.

5) Copy Files
Now that we have successfully build the project it is time to copy the result, the .ispac file, to the Artifact Staging Directory. Add a new task called Copy Files. Select *.ispac as content and use the Predefined variable build.ArtifactStagingDirectory as Target Folder.
DevOps - Copy ispac file to stage folder


6) Publish Build Artifacts
The last task is to publish the artifact, the . ispac file, so you can use it in a Release pipeline later on. Add a task called Publish Build Artifacts. By default the same Predefined variable build.ArtifactStagingDirectory is used as path to publish. Rename the artifact so that you can easily find it when building the Release pipeline.
DevOps - Publish Build Artifacts


7) Add Triggers
To trigger this build pipeline automatically when changes are committed to the Master branch we need to add a trigger. Go to the triggers menu and enable continuous integration. Then add a path filter so that this build will only trigger when the specific project changes. Then save the Build pipeline and trigger it by committing a change.
DevOps - Enable trigger to build SSIS project


Conclusion
In this post I showed you how to build an SSIS project in Azure DevOps with the SSISBuild NuGet. It took quite a few steps, but most steps are relative simple and easy to replicate in your own DevOps project.

One downside of this method is that it is a bit more strict when building your SSIS project. It could even happen that you can build your project in Visual Studio successfully and even deploy it to the catalog, but that it will fail building when using the SSISBuild Nuget and throwing you this error: ERROR: An item with the same key has already been added.
ERROR: An item with the same key has already been added


The possible cause of this error is duplicate Connection Manager Guids. This happens when you copy a package (with a package connection manager) in Visual Studio. I solved it when recreated the connection manager manually.
If you have duplicate package connection managers and you convert one of them to a project connection manager then it will hide the duplicate connection manager in the copied package, making it very hard to find.

Next step: Deploy your SSIS project


Tuesday, 2 April 2019

Stopping an Integration runtime that is already stopping

Case
My integration runtime is stopping, but it takes already more than an hour and I see errors in the ADF monitor:

Error 1: Last operation 'Stop' get the status 'Failed'. Error Code: PoolDeleteFailedDueToLockOrReference Error Message: Activity ID: a67615ac-94ff-4547-9244-728d3ae5b25e

Error 2: Error Code: VNetResourceGroupLockedDuringStop Error Message: We are unable to clean up unneeded resources when stopping your IR. Please unlock the resource group containing your VNet and/or remove any reference to the resources created for your IR, and then retry to stop your IR.

Error 3: Error Code: IntegrationRuntimeStoppingLongerThanUsual Error Message: Your integration runtime is taking longer than usual to stop, so please retry to stop it.

It suggests to retry to stop the SSISIR, but the start and stop buttons are greyed out. How do I retry the stop?

Stop and start are greyed out


Solution
The Azure portal interface does not support restart at the moment, however you can restart an SSISIR that is already stopping with PowerShell!

#PowerShell code
# Login with your Azure account (popup will open)
Login-AzureRmAccount 

# Your subscription name (needed if you have more than one subscription)
$SubscriptionName = "xxxxxxx"

# Change the current and default Azure subscription
Select-AzureRmSubscription -SubscriptionName $SubscriptionName
Get-AzureRmSubscription -SubscriptionName $SubscriptionName

# Force stopping SSISIR
Stop-AzureRmDataFactoryV2IntegrationRuntime -DataFactoryName "MyDataFactoryNae" -Name "SSISxxxxxxxIR" -ResourceGroupName "MyResourceGroup" -Force


Other steps you should take if the PowerShell does not stop the Integration Runtime:
  1. Check if there are lockes on the Resource Group or individual items (like ADF, VNET or SSISDB).
  2. If you are using a VNET, check whether it works. (Create a new SSISIR and then press validate on the VNET step)
  3. If there are no locks and the VNET is valid, but the Integration Runtime is still stopping then contact the Azure help + support desk either via Twitter of via an official support request in the portal.
1) Check for locks


2) Validate VNET


3) Add support request (in worst case)


Update: there is a new "retry stop" option available. Click on the Author (pencil) button on the left and then on connection in the left bottom corner. Now open the Integration Runtimes tab and click on the new "retry stop" button. (I hope they will add this option in the monitor as well)
Retry stopping the SSIS IR


Sunday, 17 February 2019

Updated ADF Pipeline Activity for SSIS packages

Case
In April 2018 Microsoft added the SSIS pipeline activity to ADF. A couple of days ago the released a new version. What are the changes?
ADF - Execute SSIS Package activity


Solution
The big difference is that you can now select your packages and environment instead of typing the full paths manually, but there is also an new "Manual entries" option which allows you to set parameters (and connection managers) directly within the pipeline.
Selecting package and environment


See below the old version of the SSIS activity where you had to type the full paths manually.
The old manual entry


Conclusion
Again much easier then before, but in case of package errors still not very helpful. It still forces you to search for errors in the SSIS catalog. If you are using the ADF monitor to the check for errors I would probably still prefer the Stores Procedure activity.

Wednesday, 30 January 2019

Introducing Data Flows in Azure Data Factory

Case
Since last year we can run the good old SSIS packages in the Azure cloud. Not on a self created and self maintained virtual machine, but with the Integration Runtime service in Azure Data Factory.

However Microsoft also introduced Azure Databricks and called in ETL 2.0. So I'm not sure how much effort Microsoft will put in any future release of SSIS. But Azure Databricks is not a visual tool and not everybody is into coding. Is there an alternative?
Visual ETL in Azure


Solution
You can probably keep on using SSIS for an other decade, but if indeed the development of SSIS stagnates and the rest of the data platform isn't, then it is good to learn a couple of new tricks. Within the Microsoft Data Platform we a couple of alternatives for SSIS:


  1. Azure Databricks
    As mentioned above this requires learning some new coding skills since this isn't a visual development tool. I will post an introduction in a later blog post.
  2. Azure Data Factory with Pipelines and T-SQL
    You could use the Copy Data activity in combination with the Stored Procedure activity and build all transformations in T-SQL. If you are a diehard SSIS developer then this is probably not your cup of thee.
  3. Power BI Dataflows
    The Power BI team just introduced self service ETL within Power BI. We just added a new post to explain this new option which will make some people very exciting.
  4. Azure Data Factory Dataflows
    This is a new preview feature in Azure Data Factory to visually create ETL flows. Below I will show you the steps to create you own first simple Data Flow.


1) Request preview access
If you are reading this during the preview periode (early 2019), then first request access via this form. With your Azure subscription Guid that you need to provide, Microsoft will turn this new feature on for you that specific subscription.
Check 'Version' for the preview version


2) Create Databricks Service
Yes you are reading this correctly. Under the hood Data Factory is using Databricks to execute the Data flows, but don't worry you don't have to write code.
Create a Databricks Service and choose the right region. This should be the same as your storage region to prevent high data movement costs. As Pricing Tier you can use Standard for this introduction. Creating the service it self doesn't cost anything.
Create Databricks Service


3) Create Databricks cluster
Now go to the newly created service and click on the Launch Workspace button under the big Databricks logo in the center.
Launch Workspace


A new tab will open (just like with data factory) and in this workspace we need to create a cluster. A cluster is a collection of virtual machines that will do the ETL work for you. This is also where you start paying! Click on Clusters in the left menu and then on Create Cluster (or click on New Cluster under Common Tasks in the center).
Create new Databricks cluster


For the Cluster Mode use the default option: Standard. For the Runtime Version choose: Runtime: 5.0 (Scale 2.11, Spark 2.4.0). Pyhthon version. The other options to change are the number of minutes of inactivity before terminating the machine. For this example 60 minutes should be enough to create and execute your new data flow. And most important for you wallet is the Worker Type and the numbers of workers. For this example one of the cheapest (Standard_DS3_v2) should be more than enough.
Create cluster manually


Note: In a future post I will show you how to create a cluster automatically. For now we will create one manually, but terminate it automatically when you are ready (= not doing anything with the cluster).
Creating a cluster takes a few minutes


4) Create Data Factory V2 with data flow (preview)
Create a new Data Factory and choose 'V2 with data flow (preview)' as the version. At the moment of writing this new feature is only available in 4 regions, but more regions will be added on its way from preview to general availability. So watch out with moving lots of data between regions. Also notice the option to add a couple of examples which will help you to master the Data Flows.
Only available in 4 regions at the moment


5) Add new Data Flow
Now go to the newly created Data Factory and click on Author & Monitor to go to the Data Factory portal.
Azure Data Factory, open portal


In the portal go to the Author page (pencil icon in the left menu) and then click on the three dots behind Data Flows and choose Add Dataflow. A new empty Dataflow will be created and we can start adding a source.
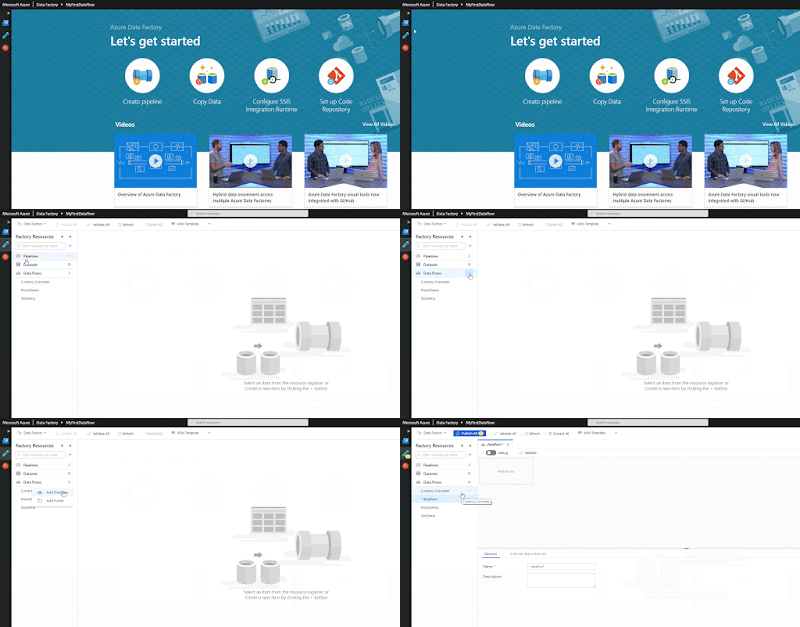
Add Dataflow


6) Add source
For this example I will use an existing file that is located in an Azure Blob Storage Container. Go to the new dataflow and click on the source to specify the file from the Blob Storage Container. First give the source a suitable name. In the second field you can find all existing datasets, but if you click on the +New button behind it, you can create a new dataset. Now you first need to give the dataset a name and then you can specify the connection to the Azure Blob Storage Container.
Adding source part 1


When creating a new Blob Storage Container dataset it only creates a link to the storage account itself. You still need to specify the container, filename and properties like delimiter and column names. To do that hit the Edit button and go to the Connections tab. Here you can specify all properties like location and file format. Next go to the Schema tab to specify the columns. You can do that manually or by clicking on the Import Schema button that will read the column names from the file. After this you can specify the datatypes for each column. Now the source dataset is ready, but we still have to map this to the source in the dataflow.
Adding source part 2


Go back to the new dataflow and go to the Define Schema tab. Use the Import from dataset button to import all columns from the dataset. The datatype is not copied from the dataset. I'm not sure whether this is deliberately or that it is a bug. Now the source is ready and we can start adding transformations.
Adding source part 3


7) Add transformation
The number of different transformations is not yet as rich as those of the SSIS Data Flow Task, but the most important transformations are available and there are also some handy new ones like SurrogateKey and Window (for aggregation on time windows) which are not available in SSIS.

On the other hand the expression language in the Derived Column is much more comprehensive with for example functions for hashing and a lot of string functions which are not available in SSIS.

For this example I will add a Derived column to upper the location column. Click on the little + behind the source to add a new transformation. Click on Derived Column and edit an existing column. When editing the expression a new window will appear. The upper method can be found under String and the column name can be found under Input. If you know SSIS then this should be very familiar.
Adding a Derived Column transformation


8) Add destination
For this example I will use an existing table in an Azure SQL Database as destination. Click on the little + behind the Derived Column to add a new item to the dataflow. Scroll down to the bottom and click on Sink. Now you can add a new destination dataset (sink dataset) for this output. First give the output stream a name and then click on the + New button to add a dataset. Choose Azure SQL Server and give the dataset a name in the next step. After that we need to create a new connection to the database server. See the animated gifs for the details.
Destination - Add sink dataset and connection


When creating a new sink dataset and its connection, it only creates a link to the SQL Server database. You still need to specify the table name and columns. To do that hit the Edit button on the dataflow destination and go to the Connections tab. Here you can specify which table you want to use. Next go to the Schema tab to specify the columns. You can do that by clicking on the Import Schema button that will read the columns from the database table. Now the sink dataset is ready, but you still need to create a column mapping.
Destination - Choose table and columns


Go back to the dataflow, click on the destination and then go to the Mapping tab. If the column names in your dataflow are the same then you can use Auto Mapping. Otherwise turn of the auto mapping and do it manually.
Destination - Mapping


9) Debug
You probably already clicked on the Data Preview tab of the source, derived column or destination and saw that you first have to turn on debug mode.
Please turn on the debug mode and wait until cluster is ready to preview data


To do this we first need to get a new token from Azure Databricks to connect from Data Factory. Go to the Databricks portal and click in the person icon in the top right. Then choose User Settings and then hit the Generate New Token button. Copy it and keep it save in for example KeePass because you wont be able to retrieve it again.
Generate New Token in Azure Databricks


Now go back to your dataflow and switch on the debug mode in the top left of the dataflow. A new form appears on the right side where you can create a new linked service to the Databricks service. This is where you need the token from the previous step. For details see animated gif. After that select the cluster that you created and hit the start button. Now it will connect to the cluster and you will be able to see the contents of the Data Preview tabs.
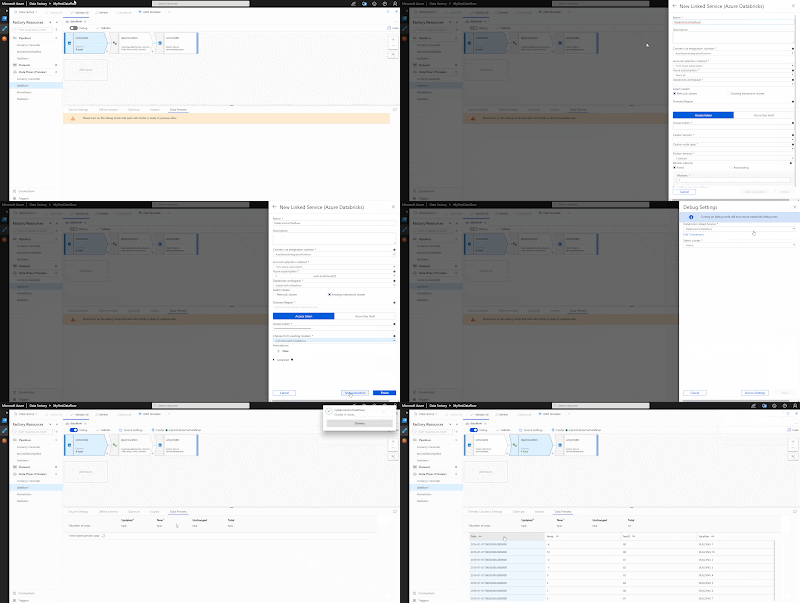
Debugging dataflow (not the actual speed)


10) Create pipeline
The dataflow is ready and we can now add it to a data factory pipeline with the new dataflow preview activity. You need to provide the name of the dataflow you want to execute, but also the link to the Azure Databricks Service. You can reuse the linked service from the previous step.
Adding dataflow to the pipeline (not the actual speed)


And the result viewed with SSMS


Summary
Microsoft created a new Visual ETL tool with lots of promising features that could become a great successor for SSIS. However it does not yet have the Visual Studio feeling like with SSIS. So that will take some time to get used to. Debugging is an other thing. It works, but takes me way to much waiting time at the moment. It will probably be faster with a more expensive cluster, but not sure it will match the SSDT experience. Besides these two notes, I can't wait to get some actual working experience with it.


Saturday, 30 June 2018

The database 'SSISDB' has reached its size quota.

Case
I'm running SSIS in azure for couple of months now, but I'm getting an error: The database 'SSISDB' has reached its size quota. Partition or delete data, drop indexes, or consult the documentation for possible resolutions. The SQL Server Agent jobs that are scheduled to clean up the log and project versions are not available in Azure.

The first time it occurred I scaled up the database tier and that solved the problem, but now it reoccurs and I don't want to keep scaling up the database tier. How do I solve this?


Solution
Since there is no SQL Server agent there are no jobs available, but there will be a solution within a couple of weeks. If you can't wait there is a workaround. First make sure the retention period and number of project versions are set to an acceptable level. If you are running and updating packages frequently then the default settings are probably a bit to high.
The default settings (right click SSISDB to see properties)


Project versions
I set the Maximom Number of Versions per Project to 3. The clean up the old project version locate the Stored Procedure (SSISDB) [internal].[cleanup_server_project_version] and execute it. There are no parameters.
Before and after running the Stored Procedure


Log retention
The same can be done for the Log retention with the stored procedure [internal].[cleanup_server_retention_window]. Again no parameters. The Stored Procedure is working with a T-SQL cursor so if your log is massive and your server very busy it could take a while.


You could even schedule these Stored Procedures with for example Azure Data Factory to clean up regularly, but keep up the SSIS announcements to see when they implement a out-of-the box solution.


Thursday, 31 May 2018

User Group meeting: SSIS in the cloud

Recently I presented an SSIS in the Cloud session at a User Group evening in Amsterdam, The Netherlands. Thank you QNH for hosting that evening. You can download the PowerPoint and in the comments you will find the blogposts that I used in my demo's.


Related Posts Plugin for WordPress, Blogger...